What did you get delivered today

WB 06 would be more for a wit beer. I got it (I think), still gotta use it.

I figure all abbaye/triple yeasts will work.
They will all be different as with Belgians it's the yeast that decides the flavour, more than the hops.
The recipe I posted is a bit middle of the road. Easy drinker, not too high in alcohol. Sort of in between Belgian ale and a blonde.
 
Not delivered, but I'm considering one of these to go along with a little bang-bang controller to see if I can get some repeatability and better control in my mashing. More or less, I'm moving to a 2 vessel RIMS brewing system, which may quickly be turned into a 3 vessel system pending a rack for it.

1705687111759.png


It's 110V 1100W, meaning pretty slow heating, but it's gonna be more for maintaining heat, not actually heating things up (unless it proves itself for that). Obviously flowrate (which I can control) and batch volume will make a difference, too. I can heat things up pretty quick with the burners I have. I already have a pump and a few bits and bobs of hardware. I looked at the Blichmann version, and since I have nothing using Tri-Clamp hardware, figured I'd try out something a little less pricy to start with that works with threaded fittings as well. Another kettle will eliminate handling hot wort while I clean out the one I currently have after mashing. I can't use bags in my current kettle because there are too many snags. That might become an option if I use this, though. I normally do most of my cleanup while I'm waiting on the boil. This thing looks to be easy to clean, but since it's hotside anyway, I don't think sanitation will be a big issue. The heating element is held in with a Tri-Clamp, so easy to remove for cleaning and I can use a brush to clean the tube. I think I can do some experimentation with this on mash times and densities to find out their effects on efficiency as well as any on conversion using different temperatures (obviously without getting too crazy with the temps).

Now I gotta find a powered igniter to start the burner under the HLT to further automate the process for heating to sparge temps while mashing and holding it there. Might be simpler/safer to get another one of these later and another Inkbird and pump for that purpose, though. Not igniting propane at the right time gets dangerous. Last thing I wanna do is blow my future brew shed up.

Comments? Anyone else used one of these? Basically the same thing @Ozarks Mountain Brew has, but a bit cheaper and not quite as many moving parts.
 
Not delivered, but I'm considering one of these to go along with a little bang-bang controller to see if I can get some repeatability and better control in my mashing. More or less, I'm moving to a 2 vessel RIMS brewing system, which may quickly be turned into a 3 vessel system pending a rack for it.

View attachment 28076

It's 110V 1100W, meaning pretty slow heating, but it's gonna be more for maintaining heat, not actually heating things up (unless it proves itself for that). Obviously flowrate (which I can control) and batch volume will make a difference, too. I can heat things up pretty quick with the burners I have. I already have a pump and a few bits and bobs of hardware. I looked at the Blichmann version, and since I have nothing using Tri-Clamp hardware, figured I'd try out something a little less pricy to start with that works with threaded fittings as well. Another kettle will eliminate handling hot wort while I clean out the one I currently have after mashing. I can't use bags in my current kettle because there are too many snags. That might become an option if I use this, though. I normally do most of my cleanup while I'm waiting on the boil. This thing looks to be easy to clean, but since it's hotside anyway, I don't think sanitation will be a big issue. The heating element is held in with a Tri-Clamp, so easy to remove for cleaning and I can use a brush to clean the tube. I think I can do some experimentation with this on mash times and densities to find out their effects on efficiency as well as any on conversion using different temperatures (obviously without getting too crazy with the temps).

Now I gotta find a powered igniter to start the burner under the HLT to further automate the process for heating to sparge temps while mashing and holding it there. Might be simpler/safer to get another one of these later and another Inkbird and pump for that purpose, though. Not igniting propane at the right time gets dangerous. Last thing I wanna do is blow my future brew shed up.

Comments? Anyone else used one of these? Basically the same thing @Ozarks Mountain Brew has, but a bit cheaper and not quite as many moving parts.
what are you using to control it, I have mine plugged into my pid control box
 
Now you have me wondering what to do. I was just trying to use a dry yeast.
 
Now you have me wondering what to do. I was just trying to use a dry yeast.
But you didn't buy the yeast Ben thought you did. BE 256 is not diastaticus
So no worries.
And diastaticus is no problem either. You just gotta be aware it finished real low in FG
 
Not delivered, but I'm considering one of these to go along with a little bang-bang controller to see if I can get some repeatability and better control in my mashing. More or less, I'm moving to a 2 vessel RIMS brewing system, which may quickly be turned into a 3 vessel system pending a rack for it.

View attachment 28076

It's 110V 1100W, meaning pretty slow heating, but it's gonna be more for maintaining heat, not actually heating things up (unless it proves itself for that). Obviously flowrate (which I can control) and batch volume will make a difference, too. I can heat things up pretty quick with the burners I have. I already have a pump and a few bits and bobs of hardware. I looked at the Blichmann version, and since I have nothing using Tri-Clamp hardware, figured I'd try out something a little less pricy to start with that works with threaded fittings as well. Another kettle will eliminate handling hot wort while I clean out the one I currently have after mashing. I can't use bags in my current kettle because there are too many snags. That might become an option if I use this, though. I normally do most of my cleanup while I'm waiting on the boil. This thing looks to be easy to clean, but since it's hotside anyway, I don't think sanitation will be a big issue. The heating element is held in with a Tri-Clamp, so easy to remove for cleaning and I can use a brush to clean the tube. I think I can do some experimentation with this on mash times and densities to find out their effects on efficiency as well as any on conversion using different temperatures (obviously without getting too crazy with the temps).

Now I gotta find a powered igniter to start the burner under the HLT to further automate the process for heating to sparge temps while mashing and holding it there. Might be simpler/safer to get another one of these later and another Inkbird and pump for that purpose, though. Not igniting propane at the right time gets dangerous. Last thing I wanna do is blow my future brew shed up.

Comments? Anyone else used one of these? Basically the same thing @Ozarks Mountain Brew has, but a bit cheaper and not quite as many moving parts.
You will be surprised. Use the main heating element in the boil/mash pot to heat the water and then use the rims to maintain temp.
 
my thought is the bottom will always be in liquid covering the element and less likely to dry fire
very true. I have a safety that wont allow the RIMs to come on unless the pump is on. , but this will make sure it is fully emersed.
 
You will be surprised. Use the main heating element in the boil/mash pot to heat the water and then use the rims to maintain temp.
That's generally the plan, but I've got gas burners for kettle heat. One of my kettles is aluminum, which isn't so bad with our water chemistry, but low pH levels in brewing turn it black inside, so I don't use it for brewing anymore. One stout batch really discolored it, so I haven't used it again since. I figure it'll be fine for sub-boiling temps, though, and it's a lot higher volume than my boil kettle, so should supply all the hot water I need. I've already added a valve and QD adapter to it so that's part of the work done.
 
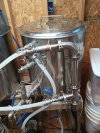
Livin' on the edge with no clamp on that hose on the effluent connection. Or is that the inlet to the RIMS tube? EIther way, that's a sticky mess waiting to happen. I've learned (the hard way) to put clamps on ALL barbed connections. They're a bit of a pain to remove when cleaning, but that's still a lot easier than cleaning up wort that's sprayed everywhere, never mind losing the wort you just put all the effort into.

I was planning to draw from the bottom of kettle, through the pump, go in the bottom of the RIMS tube, with the temperature sensor at the top like you have yours plumbed, and a hose to return it to the kettle. If I keep the Rims tube below the level in the kettle, it should purge any air from it and avoid dry firing the element. Yours looks like the flow may be top to bottom, with the heat AFTER the temperature sensor. I'm basing that statement by what appears to be a tri-clamp connection at the top bung of the kettle. Am I seeing that wrong? It'll require some thinking, but I"m hoping to be able to put a QD fitting on it so I can connect it directly to the pump outlet. Might need a 90 and a nipple to turn it. Keeping the hoses as short as possible will likely be important as well to minimize heat loss.

My thought process is I still want the column vertical to protect the heating element, but I think I want the heating element "ahead" of the temperature sensor so that I can cycle the element based on wort temperature going back into the kettle (after heating) to eliminate swings and prevent overheating the wort. I don't want to over design this, but I do want to make sure I'm not 'cooking' the wort and hosing up conversions because I put the sensor in the wrong place. I've noticed that the more I try to manually control mash temperatures, the more I overshoot and the more I miss target FG's.

Do you just run full flow from the pump, or do you control the flow with a PID?

@Ozarks Mountain Brew are both outputs of that controller PID?

This is the little bang bang I was going to use with a couple pilot relays, just like what I used for the fermenting fridge. If I do this right, I may be able to use the same control box for both mashing and fermentation temperature control, but these are cheap enough to by more. I can get 'em for about $20 each.

Inkbird Temperature controller

61-Gg2SRzAL._SL1500_.jpg

I can program the delay so it doesn't dither too much when close to temperature. My main objective as stated is to prevent scorching the mash which is hard to avoid using gas burners. Had I known then what I know now, I would have bought an electric kettle instead of the burner.

Speaking of gas, I need to go get some propane tanks refilled today.
 
my pid controls the heat element based on the temperature probe where ever its placed, my pump is a manual switch, I have a sophisticated control panel, looking at it it flows from bottom to top, kind of hard to explain how my system works but you can drain the whole system easily just unhooking one bottom hose, these silicone hoses fit so tight no clamp is needed

IMG_20240118_114958350.jpg
 
Last edited:
Livin' on the edge with no clamp on that hose on the effluent connection. Or is that the inlet to the RIMS tube? EIther way, that's a sticky mess waiting to happen. I've learned (the hard way) to put clamps on ALL barbed connections. They're a bit of a pain to remove when cleaning, but that's still a lot easier than cleaning up wort that's sprayed everywhere, never mind losing the wort you just put all the effort into.

I was planning to draw from the bottom of kettle, through the pump, go in the bottom of the RIMS tube, with the temperature sensor at the top like you have yours plumbed, and a hose to return it to the kettle. If I keep the Rims tube below the level in the kettle, it should purge any air from it and avoid dry firing the element. Yours looks like the flow may be top to bottom, with the heat AFTER the temperature sensor. I'm basing that statement by what appears to be a tri-clamp connection at the top bung of the kettle. Am I seeing that wrong? It'll require some thinking, but I"m hoping to be able to put a QD fitting on it so I can connect it directly to the pump outlet. Might need a 90 and a nipple to turn it. Keeping the hoses as short as possible will likely be important as well to minimize heat loss.

My thought process is I still want the column vertical to protect the heating element, but I think I want the heating element "ahead" of the temperature sensor so that I can cycle the element based on wort temperature going back into the kettle (after heating) to eliminate swings and prevent overheating the wort. I don't want to over design this, but I do want to make sure I'm not 'cooking' the wort and hosing up conversions because I put the sensor in the wrong place. I've noticed that the more I try to manually control mash temperatures, the more I overshoot and the more I miss target FG's.

Do you just run full flow from the pump, or do you control the flow with a PID?

@Ozarks Mountain Brew are both outputs of that controller PID?

This is the little bang bang I was going to use with a couple pilot relays, just like what I used for the fermenting fridge. If I do this right, I may be able to use the same control box for both mashing and fermentation temperature control, but these are cheap enough to by more. I can get 'em for about $20 each.

Inkbird Temperature controller

61-Gg2SRzAL._SL1500_.jpg

I can program the delay so it doesn't dither too much when close to temperature. My main objective as stated is to prevent scorching the mash which is hard to avoid using gas burners. Had I known then what I know now, I would have bought an electric kettle instead of the burner.

Speaking of gas, I need to go get some propane tanks refilled today.
At 1100 watt maybe that simple on off controller would work. Especially in A RIMS environment where it's just heating the return liquid and not the whole brew liquor.

That's what I found using an STC1000 (same as your inkbird) what you call bang bang controller is overshooting the mash was gunna happen without tempering the wattage to the element. This way I could keep to within .5c above the off temperature target.

In a rim's the overheating whilst the element cooled would be in the rims tube therefore stopping the temp swing In the main mash.
 
Livin' on the edge with no clamp on that hose on the effluent connection. Or is that the inlet to the RIMS tube? EIther way, that's a sticky mess waiting to happen. I've learned (the hard way) to put clamps on ALL barbed connections. They're a bit of a pain to remove when cleaning, but that's still a lot easier than cleaning up wort that's sprayed everywhere, never mind losing the wort you just put all the effort into.

no, that is the outlet, but it is low pressure side. has a QD that goes into the fly sparge arm. has been that way for 4 or 5 years, I trust it :p
I was planning to draw from the bottom of kettle, through the pump, go in the bottom of the RIMS tube, with the temperature sensor at the top like you have yours plumbed, and a hose to return it to the kettle. If I keep the Rims tube below the level in the kettle, it should purge any air from it and avoid dry firing the element. Yours looks like the flow may be top to bottom, with the heat AFTER the temperature sensor. I'm basing that statement by what appears to be a tri-clamp connection at the top bung of the kettle. Am I seeing that wrong? It'll require some thinking, but I"m hoping to be able to put a QD fitting on it so I can connect it directly to the pump outlet. Might need a 90 and a nipple to turn it. Keeping the hoses as short as possible will likely be important as well to minimize heat loss.

it goes this way; kettle->pump->HERMs coil->RIMs->kettle (see pic)

so what you are seeing is a tri-clamp on the outlet going to the kettle. the bottom of the RIMs inlet in the outlet from the HERMs, so it does indeed fill from the bottom.
My thought process is I still want the column vertical to protect the heating element, but I think I want the heating element "ahead" of the temperature sensor so that I can cycle the element based on wort temperature going back into the kettle (after heating) to eliminate swings and prevent overheating the wort. I don't want to over design this, but I do want to make sure I'm not 'cooking' the wort and hosing up conversions because I put the sensor in the wrong place. I've noticed that the more I try to manually control mash temperatures, the more I overshoot and the more I miss target FG's.

I have two temp sensors, one in the kettle and the one you can see on the RIMs outlet. the controller weighs the two temps to decide if it need to turn off the RIMs and control HERM water temp. both are PWM output from the controller
Do you just run full flow from the pump, or do you control the flow with a PID?

pump flow is manually controlled with a valve on the outlet of the riptide pump. I try to keep the flow high as I can without pumping out under the BIAB bag. I have a liquid sensor about 4" up from the bottom of the kettle that shuts off the pump if you do.
@Ozarks Mountain Brew are both outputs of that controller PID?

This is the little bang bang I was going to use with a couple pilot relays, just like what I used for the fermenting fridge. If I do this right, I may be able to use the same control box for both mashing and fermentation temperature control, but these are cheap enough to by more. I can get 'em for about $20 each.

Inkbird Temperature controller

61-Gg2SRzAL._SL1500_.jpg

I can program the delay so it doesn't dither too much when close to temperature. My main objective as stated is to prevent scorching the mash which is hard to avoid using gas burners. Had I known then what I know now, I would have bought an electric kettle instead of the burner.

Speaking of gas, I need to go get some propane tanks refilled today.

20240122_133753.jpg
 
Last edited:

Back
Top