Fun - Brewer's Friend - Part 2
Brew your best beer EVER. Start your Free Trial of Brewer's Friend today! Sign Up ×

Archive for the ‘Fun’ Category

Brew Shed Complete and Brewing

Sunday, August 14th, 2011

The brew shed is looking good in time for the rains to return. It is a relief to have it done (at least on the outside). All it needs is interior trim. Slowly but surely all the equipment is migrating out there.

brew shed

The best part is the brewery is now operational. The first brew was an American Hefeweizen and it went great! The beer was drinkable in a week. It is already on draft and quenching my thirst. It’s true – a cool glass of hefe comes in real handy after painting all afternoon.

home brewery

My brew rig is presently a gravity fed electric setup. The main reason I made the push to go electric is the hazard of using propane indoors. It wasn’t cheap to go electric, nor was it without a few minor headaches. However, the team at HighGravityBrew.com is just awesome. They have all the parts you need worked out in advance. I highly recommend their products.

electric brewery

In the next few posts I will cover how to ‘go eletric’ and what it involved. I have to say I love it. Electric brewing is so quiet. It heats up fast (+4 degrees Farenheight per minute with about 8 gallons). Scorching is a myth – at least with the low density stainless steel element I got.  That light batch of Hefe was done in part to test for scroching – there was none whatsoever. I did have to modify my immersion chiller so it didn’t crush the element.

brew shed

I hope this inspires you to do your shed too. Total cost $8200.

Plans for the future:

  • RELAX!!!!
  • Finish up brew stand, add trim to front.
  • Fermentation chamber. I can build one of these for about $225. Next year…
  • Hops trellis on the front. Next year…

My advice to fellow brewers:

  1. Make at least two batches of thirst quenching beer BEFORE you start a shed. That way you have something to enjoy after working all day.
  2. Take the time to make the brewery functional and look cool. A brew shed is a once in a lifetime project for most people. The galvanized panels in my shed were hard to work with but the results were well worth it. I love the reflective look. It should last a long time. I wish I would have thought ahead about the wiring layout though. I had to work around where the electrician put one of the switches. It worked out fine but it would have made life easier had I drawn out everything.
  3. Invest in ventilation. Commercial vent hoods are really expensive ($600+). You will need a good one in order to vent all the steam out of the brewery during the boil. A kitchen hood is not powerful enough. Thankfully, my loft doubles as a vent hood. The intake is a dust collector attachment from a wood working catalog. The fan I went with is the Can Max Fan Mixed Flow Inline Fan (6-Inch 334 Cubic Feet Per Minute). It is quiter than the poplar 6″ Vortex fan, and has a built in 3 speed switch.
  4. Go electric for indoor brewing. Don’t even think about it, just do it. Yes it is a luxury, but it is night and day over propane. It is more energy efficient and safer (if wired correctly). HighGravityBrew.com is the place to go for parts. Porpane + indoors = recipe for Darwin award. I used to do it in my garage with the bay door open. Reading up about propane accidents scared the crap out of me and my wife (this helped justify the purchase too).


Stone Brewing Tour in Escondido

Monday, August 1st, 2011

We had a chance to visit Stone Brewing in southern California last month. It is a blast, I highly recommend it. After the brewery tour, they give you a predetermined ‘flight’ of their four main beers. Tours are every two hours most days. We went on a Tuesday and it was full but not too busy. Their main website: https://www.stonebrew.com/

stone brewing arrogant bastard

The exterior is very nondescript. There is no signage. When you see ‘growler fill parking only’, you know you are in the right place.

stone brewing entrance

I do think their beer quality has slipped some. I noticed some harshness in the Arrogant Bastard, not as smooth as I remember – but still a flavorful bitter beer. Their IPA is very good as people often say. I think the batch we were sampling from in the tap room was a little green. The pale ale was over mineralized and tasted chalky. Still, tastier than many batches of home brew I have made.

Their location also features an upscale bar and bistro.

It is not a typical burger and a beer joint. If you come with an appetite be prepared to pay. There are a few exotic things on the menu, like Duck Tacos, which we avoided. You can get a Buffalo burger for $16.50. The food was good, prepared with care, and the service was excellent.

stone brewing bistro

stone brewing bar

The garden area out back is great for relaxing while waiting for the tour to start. I took a short nap back there after drinking an Arrogant Bastard and having the sausage and potato dish. Yes!

stone brewing garden

The Brewery Tour:

They do approximately 10,000 pound grain bills for their batches. That is about 1000 times a typical home brew recipe, so they must be doing 5000 gallon batches.

stone brewing grain

stone brewing brewery

stone brewing grain

The tour guide said a typical fermentor holds enough beer for a single person to drink a six pack everyday for the next 60 years. I think he said it was a 500 barrel fermentor. A single beer barrel in the US is 31 gallons. That means there are 128 x 31 = 3698 ounces in a barrel. Checking the math: 60 years * 365 (days / year) * 72 ounces / day = 1,576,800 ounces. Divide that by 128 and we get 12,319 gallons. Divide that by 31, and we get 397 barrels, so yeah it is about right. So by that logic each man needs about 1.5M ounces of beer in his lifetime. Honestly, drinking a six pack per day would probably be enough to kill me in a few months. I’ll stick to moderation thank you very much, Stone Brewing tour guide.

They are using American and New Zealand hops from the boxes in the hop storage area – damn that smells good in there! The water supply is via Rincon, which is essentially from San Diego County which is fed from a combination of the Colorado and the Sacramento-San Joaquin River Delta. That is a long way to move that water. They carbon filter it several times then re-add brewing salts.

I love this see through pipe that shows the color of the brew being made:
stone brewing brewery

The place is huge, all under one warehouse style roof. Sort of like being in heaven:
stone brewing brewery

Their main website:
https://www.stonebrew.com/

The Bistro:
https://www.stoneworldbistro.com


Brew Shed Update

Saturday, June 25th, 2011

The shed is taking its final shape. The roof is on, skylight is in, and gutters installed. The electrical is in and the inspection passed!

brew shed dominates

The paint job is just primer right now. It was all done by hand with rollers or by brush so it soaked in good. I was told by a friend who is a home inspector that spraying paint on T-111 will cause problems later. I plan to paint the trim brown for an exposed timber look. Painting T-111 is hard work, especially in the grooves. It took 4 gallons to get two coats of primer on the entire shed.

brew shed dominates

The entire shed is insulated. Before I insulated, I air sealed all the seams with caulk. For larger gaps I used expanding foam. I am working on getting the metal panels in place for the brewery section under the loft. I’m not that happy with how the corrugated panels line up at the seams. I might go with tile, or even metal tile, but that gets expensive fast.

brew shed dominates

The loft is good for storage and also forms a natural vent hood. The opening for the intake on the exhaust fan is visible on the left.  I looked into the expensive stainless steel kitchen hoods. Damn those things are spendy (minimum $600). This is an experiment on my part but I think it will work out fine.

brew shed dominates

The electrical panel has some spare circuit breakers and plenty of juice. I went with a 50 amp service installed by a professional signing electrician. To save money, I dug the trench and crawled under the house to run the wire. With 50 amps there is room for electric brewing in the future. To make it even easier when that time comes, I ran a wire inside the wall of the shed. If I ever want to switch to electric, all I need to do is buy a breaker and outlet.  My kettle and HLT will need adjustments too. That project will likely take 12 trips to the hardware store. I’m waiting on that adventure for now.

Next steps:

  • Sheet rock.
  • Exhaust fan.
  • Finish metal section for brewery.
  • Brew!
  • Then deal with all the little cosmetic details like interior paint and a nice trellis for the hops.

I’ll warn you, this project may look cool, but it has been a lot of work. It gets complex and expensive. So far I am in about $7,000. There is a lot of over head work up on ladders. I have skinned my knuckles many times, and cussed out loud many more. My beer supply is dwindling as I have not had time to brew. My wife has been just great about the whole thing and has helped on many sections. Without her I could not have done this.

I will be glad when this is completed and I can brew again!


Brew Shed Is Framed and Sided

Saturday, May 14th, 2011

With the brew shed foundation poured and cured the project continued forward. It takes about a month for concrete to cure. It also takes about a month for spring to kick off in Oregon.

Reminder to our readers: You know you are seriously addicted to home brewing when you start making plans for a brew shed!

Three of us bolted down a pressure treated sill plate, then put up all four walls in one afternoon. The framing of the roof and sheathing took another two afternoons. One more solid day should finish off the roof and trim. Then it will need a couple coats of primer and paint. After that I will turn my attention to the electrical panel.

Brew shed walls

Details about the shed:

  • Walls are just under 8 feet tall. This way the siding overlaps the concrete a little.
  • I went with 5/8” T111 siding, which works both as sheathing (like OSB), and siding (like lap boards). I found this was the best bang for the buck in terms of appearance and price.
  • The 12′ x 12′ size feels roomy enough for a brewery without hogging the back yard.
  • The height at the peak is 11′ 6”.
  • Total cost was about $2200 for all the materials, delivered.

Brew shed framing

Brew shed roof
(Roof framing completed).

Recommendations:

  • Use a qualified contractor who has experience building houses. There are a lot of little details that go into framing I had no idea about. You want your brew shed built solid with the help of a professional.
  • Check with local city / county building codes before getting started.
  • Get the materials delivered. A local place only charged me $80 to have everything delivered at once.
  • Charge it and get credit card mileage points / rewards.
  • Keep natural lighting in mind. This shed has a skylight and two windows.
  • Design in a big door that is easy to get items like kettles, keezers, and drunk friends in and out.
  • Keep your dimensions in units that work well with basic lumber sizes. Multiples of four are good.
  • Consider going with 2×6 construction for added insulation value. It my case it wasn’t worth going past 2×4 walls, but it might be in yours.
  • Add in a loft. Mine has one in the back at seven feet high. The brewing equipment will fit nicely under there.

Brew shed sheathed
(Framed and sheathed, ready for shingles).

Brew shed looking outside
(Lots of natural light are a good thing).

More articles to come on the subject of brew sheds.


Brew Shed Slab Is Poured

Saturday, April 16th, 2011

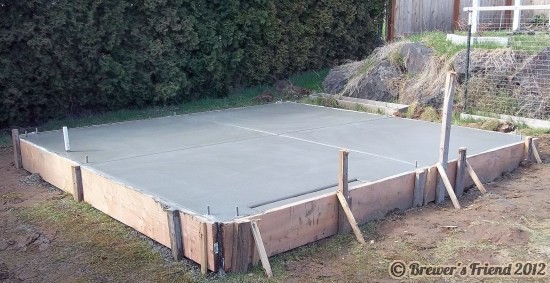
The brew shed has gone from the drawing board to reality. The slab has been poured! Late into the evenings last winter I had been making plans for this project. Now it is underway! Next step is to frame and roof it. That will be happening soon and I will post pictures.

May I remind our readers: You know you are seriously addicted to home brewing when you start making plans for a brew shed!

Brew shed slab

Details about the slab:

  • 12′ x 12′
  • Mono pour
  • 4” thick
  • 6” wide footings around the edge 8” deep, reinforced with rebar
  • Vapor barrier
  • Wire mesh
  • J-bolts (achor bolts), three per side, which the treated sill plate will bolt to.
  • Made space for door jamb
  • 4 hops plants already added out front.
  • Total cost: $1200.

You can get the price down on the slab if you do it yourself. The bill from the concrete ready mix truck was under $300. Be prepared to dig and level the area first. Then add a base of gravel and tamp. Then install the forms, haul in more gravel, tamp, etc… It adds up to many hours of hard labor. Not being an expert at this, or knowing anybody who was willing to help, writing a check was the simplest solution. I plan to use my wood working skills and help out with the framing in the next phase.

Brew shed slab prep work

Brew shed all ready

Brew shed slab

Ideas for an over the top brew shed foundation:

  • Go with stamped and dyed concrete pattern. It is amazing what can be done with decorative concrete. This was more than double the price. Someday I might cover my basic gray floor in tile, but I don’t have immediate plans.
  • Acid stain over the concrete – this looks good too, and is more affordable than a stamped pattern.
  • Polished finish, again for looks more than anything. My concrete guy said it would cost about $300, or I could rent the machine.
  • Add in your plumbing pipes ahead of time – floor drain, sewer line, supply line. I opted out of these for cost reasons.
  • Add insulation underneath the slab. This can really help if you plan to make it climate controlled.
  • Design the layout of the building with hops in mind. Plan to cover the shed in hops! I have already planted 4 new rhizomes on the southern exposure.

Alternative Designs:

I considered doing posts supporting a wooden floor. Ultimately a wooden floor is just about as much work as a slab. The slab will perform better and last longer. With a suspended floor animals can tear up insulation from underneath. Oregon is really wet too, and I figured the concrete would hold up better.

Stay tuned for more from Brewer’s Friend!


Brewers Cannot Spell – Fermentor or Fermenter?

Saturday, February 26th, 2011

How do you spell fermenter, fermentor? According to my text editor both are spelled wrong! It is the big tub we put the wort in, add the yeast to, and watch bubble. It can also be called a fermentation vessel, carboy, or simply the primary.

fermenter

fermentor

According to google, fermentor gives 266,000 results, fermenter gives 725,000 results. Hmmm….

In product search, fermentor gives 689 results, fermenter gives 45,300 results. According to the market, the correct spelling must be with an ‘e’, fermenter.

It turns out yeast are also a fermenter, because of the ‘er’, in other words they do the fermentation.

This is giving me a headache. I’m ready for a beer. Here’s how my latest pale ale turned out:

good beer

Ahh that’s nice.


Brew Shed Plans The Obsession Continues

Tuesday, January 18th, 2011

Home brewing is a fun hobby with many aspects. There is always something to do – a new batch, a do it yourself (DIY) build, or a brew shed.

The progression starts with a $150 kit from a friend and a 5 gallon batch of ale. This can lead to spending hundreds of dollars on equipment, including refrigeration systems, large boil kettles, and even computer controlled brewing sculptures. All this stuff needs a place to be kept. Closets, garages, basements, or a spare bedroom is where it beings to collect. Eventually, the brewer realizes a dedicated space is required. Separation of space is a good thing for the brewer, and for the rest of the brewer’s family.

You know you are seriously addicted to home brewing when you start making plans for a brew shed!

Here is a sketch of what I plan to build in the back yard:

brew shed tudorbethan

The style is called timber framing or Tudorbethan and echos architecture in Germany/Austria from centuries past. I love the old world look and so does my wife, but it is not for everybody. I wanted room to store all my equipment, space for a computer desk, and lots of natural light. I plan to go with a monastery feel inside. I am thinking of a tile floor that looks like stone. Exposed beams will be faced in walnut. The stained glass window will shine on the brew sculpture in the morning!  A real place to meditate on brewing and get away from everything.

brew shed exposed beams

Design Considerations:

Some brew sheds double as a bar and hangout area (aka bloke shack). Many feature a man cave theme, hot babe posters, a big screen TV for watching the game, track lighting, and seating. Electrical and plumbing are good to consider, but they increase the cost. I found insulation is expensive, but essential since I want to store my wine out there too. It will have A/C and a heater to keep it between 50F-65F.

The brewing area will have an exhaust fan since I will be using propane initially. Never brew with propane in a non-ventilated area!

This shed doesn’t require permits here in Portland Oregon because of its size and height. It will be within the required property line setbacks. Check with your local building/zoning office to make sure your project conforms to the rules.

Google SketchUp was what I used to draw the plans. Their 3D warehouse is amazing. Someone had already taken the time to design brewing sculptures, kegs, freezers, etc. Look in the ‘components’ section of SketchUp to find that stuff. Very helpful and all free!

Here are the best pages I could find on others who built brew sheds:

https://www.homebrewtalk.com/f19/problems-swmbo-kids-195238/
https://www.jrbrewing.com/brewshed/
https://www.homebrewtalk.com/f11/my-new-brewery-alehouse-shed-brewing-porn-99310/
https://www.homebrewchatter.com/board/showthread.php?11067-My-brew-shed-build

You can also go with a pre-made option, such as these:
www.socalsheds.com
I personally wanted to design and construct my own brew shed, but some pre-built sheds are pretty nice too.

Cost and Time Line:

The materials estimate is around $8,000 for the complete 12’x16′ shed. That does not count labor I hire out. Keep in mind the $8,000 includes heavy duty concrete piers, electrical work, energy star doors and windows, insulation, a metal roof, gutters, etc. Hopefully we start getting the foundation in place this Spring. More to come on this topic!


Benjamin Franklin’s Birthday

Thursday, January 13th, 2011

Benjamin Franklin’s birthday is coming up Monday, January 17th. This year it happens to fall on Martin Luther King, Jr. Day, which makes it a day off for a lot of folks in the US. I plan to brew in honor of both!

Ben Franklin Quote:
“Beer is proof that God loves us and wants us to be happy.”

Benjamin Franklin

There is some controversy over whether or not Ben actually said this. Apparently the quote comes from a letter he wrote, where in context he was talking about how the rains feed grape vines, and how good wine is. His exposure to fine wine makes sense. He spent a good deal of time in France as a diplomat while trying to get support for the revolution. The quote sounds great and fits with his popular style of witty truths. Even so, historians jumped on it and tore it apart:
https://urbanlegends.about.com/b/2008/09/15/misquote-ben-franklin-on-beer.htm

Personally, I am 100% sure Ben Franklin would be into home brewing, blogging, and beer.

What type of beer he would have had access to is another question. Unlike the so called hops shortage we had last year, there was a real hops shortage in the 18th century colonies. Also, many of the modern hop varieties we know and love did not exist back then. Some research indicates Goldings would have been available. The beer style would have been British (since America was under 21 years old still), and I bet it was towards the deep pale to brown end of the color spectrum. Molasses might have been an ingredient – the tax was ignored in the colonies!

Benjamin Franklin

This site has an excellent write up with detailed information on the topic of Poor Richard’s Ale:
https://www.benfranklin300.org/etc_article_ale.htm


Deschutes Brewery Tour

Saturday, November 27th, 2010

I visited Deschutes brewery in Bend, Oregon recently. The tour was fun and the free beer was great. They let visitors enjoy four complimentary 4oz samples from any of their main styles (Stout, Porter, Mirror Pond, IPA, and Cascade Lakes Organic). That works out to a free pint! They will also have small number of seasonals or special brews on tap to choose from. Do not expect the same selection available at their brew pubs (one in Bend, one in Portland). I hit up the brewery both days I was in Bend. It just happened to be ‘on the way’ to where we were going on our trip through central Oregon.

deschutes brewery

I highly recommend the tour, it was hands down the best I’ve ever been on. They are used to having home brewers visit and are open about their processes. It was a great learning experience. Here are some of the highlights:

deschutes brewery

Deschutes Brewing Process:

  • They centrifuge their beer (as opposed to pasteurize or filter).
  • They use 4 carbon filters on the local city water, then add brewing salts to style.
  • Brewing kettles come from Germany, Huppmann brand. They are seamless construction. The kettles are so big they had to shut down a highway to truck them into Bend Oregon.
  • They re-pitch yeast up to 4 times.
  • Use an advanced laboratory for analyzing ingredients, wort, and beer to ensure highest quality and consistency. If they get an off batch they will make another batch to offset the problem and then blend the two.

deschutes brewery

About The Business:

  • Founded in 1988, still privately owned and independently operated by its founder Gary Fish.
  • Deschutes is currently the top independent brewer in Oregon, and has a goal of becoming the top microbrew in the US.
  • Deschutes is looking to buy or build a brewery on the east coast to expand operations in that part of the country.

The Culture:

  • The ‘restroom’ adjacent to the lunch room is actually a tap room.
  • Everyday each employee gets a free pint of whatever they would like.
  • They have a gourmet chef on site to prepare food for the staff.
  • They have a strict quality control process and use lean practices.
  • All employees can participate in tasting the beer for quality control. This includes being slipped off flavors and learning to distinguish between defects. Very cool way to learn about tasting!

deschutes brewery

deschutes brewery

For Home Brewers:

  • They will give you hints about their recipes, but it is not a lot to go on. They give a rough outline of the ingredients only. The times, temperatures, and amounts are up to you. Turns out that is essential to getting it right, I’m still trying to perfect my Mirror Pond clone…
  • Here’s a hint I saw written on a whiteboard in the brewery: boil the ESB and Green Lakes for 75 minutes.

deschutes brewery

deschutes brewery

The main Deschutes hub is in Bend, OR (brewery on west side of river, brew pub downtown). If you are ever in Portland, check out their brewpub in the Pearl District. They have a wide selection of locally made brews, and great food.

deschutes brewery

For more information:
https://www.deschutesbrewery.com

Deschutes was kind enough to hook me up with a t-shirt for writing this post.


Ninkasi Tasting Room Tour

Friday, October 22nd, 2010

Something has been stirring, or brewing rather, in the Whiteaker neighborhood in Eugene, Oregon (go Ducks! – ranked No. 1 in Football, AP). No, not football, even though we did just STOMP UCLA yesterday, it is Ninkasi Brewing Co an aggressive craft brewer, which is quickly rising to the top of the north west beer scene. The latest Ninkasi expansion is their new brew house and attached tap room. I dropped by for a taste and took some pictures.

ninkasi brewing company

ninkasi beer

Very cool craftsmanship on this metal gate.

ninkasi brewing company

When I first heard the name Ninkasi a few years ago, it sounded Japanese to me. It turns out the name comes from a Sumerian goddess of beer. Apparently she brewed daily! There’s also an asteroid named 4947 Ninkasi somewhere in outer space.

Anyhow, back to present day, the tasting room is the best place to try fresh Ninkasi beer. The first thing I noticed on both my visits was the sanitary smell (ammonia?). Hey, sanitation is a good habit to be in for a brewery. I’ve been in much danker smelling brew houses, which I won’t name, but you know what I mean (nudge nudge).

ninkasi brewing company

ninkasi brewing company

The fire pit is pretty cool to look at. The more I drank the more I thought about waving my hands over the flames, NOT A GOOD IDEA!!!!

ninkasi brewing company

The tap room is open 7 days a week. They offer a sampler set of their main beers, pints, and seasonals. I have to say the Tricerahops Double IPA is my favorite. They also have a basic food menu, so bring your appetite and make an evening of it.

ninkasi brewing company

Ninkasi is cool in that it bottles to 22 oz craft bottles and sells them by the case. Costco has good deals on them. I have a friend who recently started brewing. He was saving up the Ninkasi bottles for his inventory. He says the labels peeled right off after soaking in warm soapy water. Not all brands are that easy to get the labels off. If you are doing this, save the cardboard case too, it comes in very handy for storing the bottles.

For more information check out this link:
https://www.ninkasibrewing.com/tasting_room/

Ninkasi was kind enough to hook me up with a t-shirt for writing this post.


Want no ads? Go Premium and unlock all our brewing tools!