Fun - Brewer's Friend
Brew your best beer EVER. Start your Free Trial of Brewer's Friend today! Sign Up ×

Archive for the ‘Fun’ Category

A Discussion With John Compton – Highway Manor Brewing

Tuesday, September 29th, 2020

By Udit Minocha

Do you remember how you got into homebrewing? John Compton III of Highway Manor Brewing, in Camp Hill, PA, remembers it all. One of his favorite beers was Franziskaner Dunkelweizen.

How John Got Started in Brewing

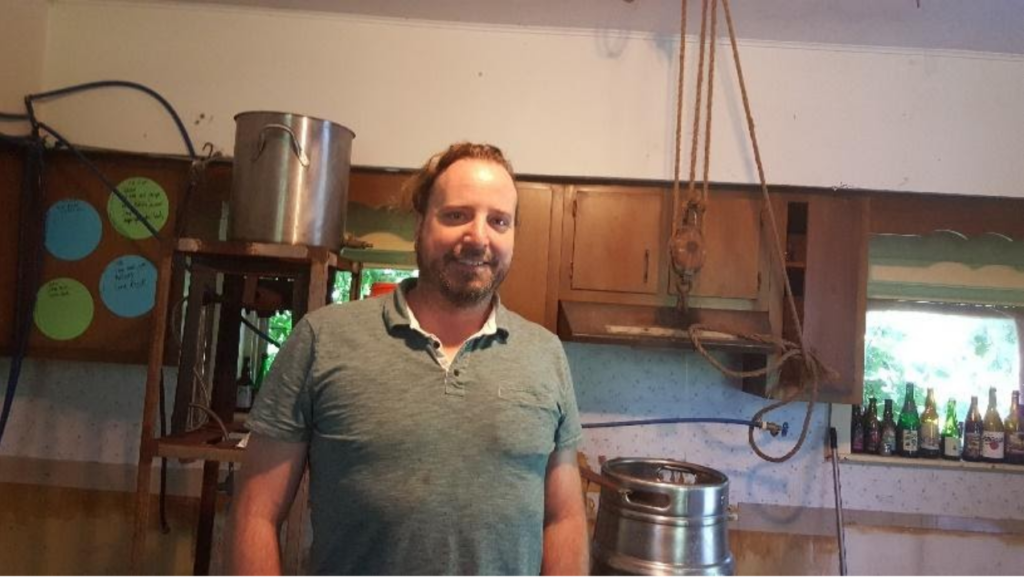
John Compton with homebrew equipment.

John started brewing in 2001. His parents, who were quite religious, were were not crazy about the idea. Since it kept him out of trouble, they felt it was worthwhile. The book that got him into brewing was “Brew Classic European Beers at Home.” He didn’t even get to try his first batch after those patient weeks of waiting because the dog got into it first. His woodworking career never took off, and John ended up devoting most of his free time to brewing.

Shortly after finding what commercial beer styles he liked as a drinker, he attempted to replicate them and their flavor profiles in his recipes. He used yeast dregs from Belgian beers. He felt it was key to understand everything about the ingredients and yeast.

In 2006 at Monk’s Café and Memphis Taproom in Philadelphia, PA, he had his first wild Belgian beer. At that time sour beers were a weird oddity and not widely available. Replicating Belgian sours was more difficult. He started doing more research on the wild yeast that predominated the area around the Abbeys. John asked himself how to get that yeast?

Replicating the Masters Before Him

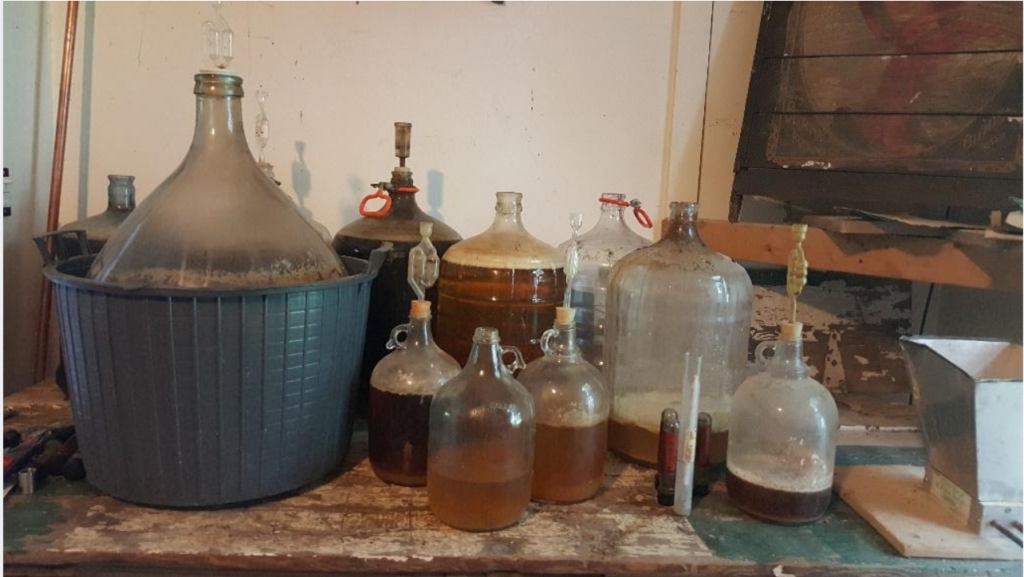
A Collection of sour beers in carboys

First, he tried to capture the wild yeast that lived around his home. He set out one gallon jugs containing wort. Most were terrible and experience became wonderful teacher – if they smelled like dirty feet or blue cheese – he dumped them before trying them. A few attempts seemed promising.

In 2010 -2011 he met Terry Holbacher of Pizza Boy Brewing Company and Vinnie Cilurzo of Russian River Brewing Company where he was introduced to more sour beers. John brewed a lot more sours and started entering homebrew competitions. Although sour beers were not yet main stream, they were in his future. He put together a plan; make about 3-5 great sour beers, make them stand out, and barrel-age them.

Going Pro

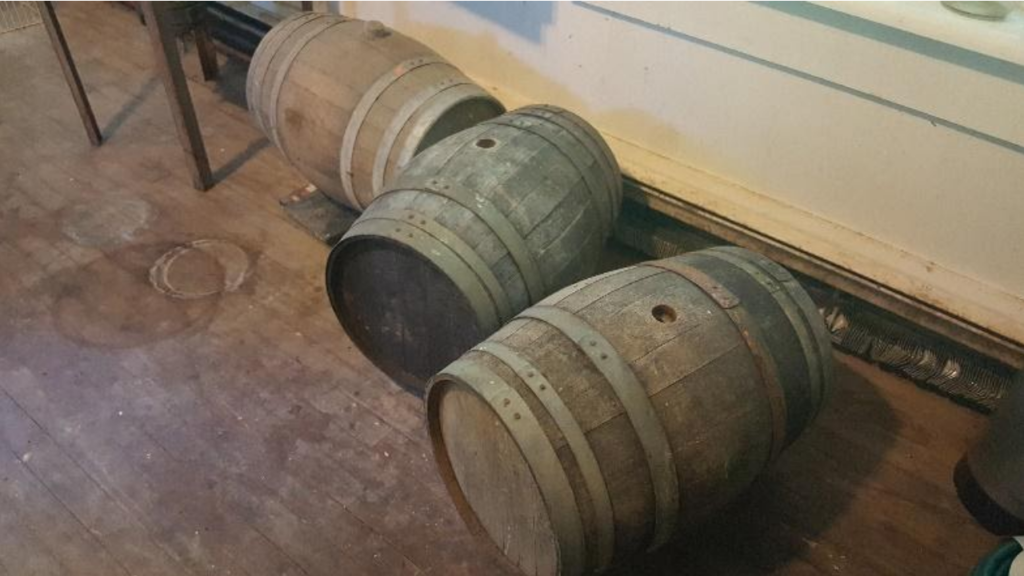
Three Sour Beer Barrels

That is how Highway Manor Brewing got started in September 2015. But that is only the beginning. In the initial stages, it took five brews a day to fill one wood barrel. Fermenting and aging took about a year or more. There are as many as four different wild yeasts fermenting the sour beer at once.

The recipe formulation, legal paperwork, ordering supplies, and fixing things were was taxing as the 5-batch a day brew days. Tackling the consistency factor on wild brews was just icing on the cake. That is how wild fermentations are – sometimes they go from wild to crazy!!

John had to make more time for himself. He moved a bed into the brewery to save on travel time. Any startup brewer will tell you that there is more than just making beer.  You have to sell it. That is a tale for a different day but in short, it takes a lot of time and effort.

So far the sour beers are available in Philadelphia, New York City, Rochester, New York, Florida, and Maryland while Vermont and New Jersey distribution is in the works.


Pre-Prohibition Beer Bottle Lamps – Art, History and it Lights Up!

Friday, May 17th, 2013

If you are looking for a cool item to give to the brewer who has everything, check out Peared Creation. They make lamps out of pre-prohibition beer bottles. We were sent one of these lamps to review! The cord is an antique fabric style. The on/off switch is a vintage faucet handle. It gives a nice warm amber light. The lamps use standard 15 watt bulbs and each lamp comes with a spare bulb. Each lamp includes a tag that contains more information about the particular brewery the bottle came from. While the lamps are not cheap, starting at $125, they are unique and offer an authentic and intangible historical component you can’t get at Walmart or Target.

Peared Creation has several designs to choose from:

home brew lamp

lamp with beer bottle

pre prohibition beer bottle lamp

pre prohibition bottle

Peared Creation also has a wide range of pre-prohibition bottles which can be purchased separately from their lamps.  In looking through the selection, they sure don’t make beer bottles like the used to. I like how the brand names are embossed in the glass. It is also interesting to note that there was a larger percentage of clear bottles back then.

I can’t imagine how frustrating the prohibition must have been for brewers! I don’t recognize any of the names of the bottles, probably because they all went out of business. 

I asked Jay at Peared Creation about the possibility of re-packaging home brew into pre-prohibition bottles. His reply: “I wouldn’t trust the bottles to drink out of. Many of them have been in the ground for 100+ years and minerals have been leached in and out of the glass.” 

That’s a bummer, would look cool, but better to err on the side of caution. I’ll keep using the pre-prohibition bottle for a lamp, and stick my my recycled bottles for beer.

By the way, I am trying to talk my wife into letting me keep the lamp in the house.  For right now it is in the shed – works for me.

brew shed lamp

home brewing lamp

Post by Larry


Precision Hydrometer, Cool a New Toy!

Friday, March 8th, 2013

A precision hydrometer is a fun upgrade and only runs about $15. Yeah, taking measurements, entering brew logs, and doing brewing science – this is fun!

I’ve broken a few hydrometers on accident over the years and normally bought the cheap ones that read from 1.00 to 1.16. These are all purpose models meant for beer and wine makers. An SG of 1.16 is approximately 36 Brix, which would be 24.9% ABV!  The recipe calculator can handle a beer that strong, but I don’t think I’d enjoy 5 gallons of 50 proof beer.

With a scale that reads up to 1.070 (~17 Plato) this precision hydrometer is fine for most beers. The reduced range makes it is easier to read and provides a higher level of accuracy. I checked my records, and out of all the batches I’ve brewed, only a handful are above an OG of 1.070. I still have the old one as a backup for the next time I brew a barely wine or an IIPA. Even so, this would be my go to hydrometer for measuring FG. The flute is narrow and the glass is delicate, so instead of banging this one around, I hand dry it and put it back in the plastic case it came in each time I use it.

precision hydrometer next to economy hydrometer beer brewing
Here they are floating in water for comparison.

economy hydrometer beer brewing

precision hydrometer home brewed beer

There are four important factors to be aware of in order to take an accurate hydrometer measurement:

  1. The temperature the hydrometer is calibrated to (usually ~60F / 68F, ~15.5C / 20C). Only at the calibration temperature does the hydrometer read true.
  2. The temperature of the sample. The hotter the sample, the lower the instrument will read. For example, a reading of 1.040 at 100F would really be 1.044 on a hydrometer calibrated to 68F, and 1.046 for one calibrated to 60F. Always let the sample cool down before handling it or letting it touch the delicate glass. I prefer to wait until it is around 80F.
  3. The offset for the hydrometer. In theory it should be zero, but with a cheap one you never know. We have a post on how to check if your hydrometer is correctly calibrated.
  4. Also, make sure your thermometer is calibrated correctly.

The Brewer’s Friend Hydrometer Temperature Correction Calculator adjusts for the temperature of the sample and the hydrometer calibration. This is also built into the brew log entry screen under the brew feature. The hydrometer calibration, and its offset (#1 and #3) can be stored in your Brewer’s Friend account profile. These values automatically slot into the brew log entry screen when you record gravity measurements.

Taking this a step further:

There are precision hydrometers kits out there that contain multiple instruments – one for measuring the OG and another for the FG.

This model is a good intermediate upgrade, and may be my last – if I don’t break it on accident!

Post by Larry


Jockey Box Setup For Parties

Friday, January 11th, 2013

When I first started kegging, I soon realized how much simpler taking beers to parties would be. I’d take ONE big container of beer, and dispense it. No more super heavy coolers of glass beer bottles to lug over and bring the empties back for cleaning and reuse.

Until this fall I’ve been using a picnic tap to dispense my kegged beer when I’m away from the keezer. I have used a big metal trash can lined with a contractor-grade extra thick trash bag to hold the keg(s). I pour ice ½ the way up the kegs to keep it at dispensing temperature. If I’m only using one keg, that’s a lot of ice (30 or more lbs) to get the keg properly surrounded with ice.

We have a big party at our house to celebrate Fall. Typically we have 60-70 people show up. We kick 2 corny kegs of beer and most of a keg of root beer. I had wanted a better way to dispense the beer, and had been using a Craigslist trawler for months to see if I could find an appropriately priced jockey box.

After about 8 months of waiting, I scored a major Craigslist deal on a 2 tap jockey box that was set up for commercial Sanke kegs. It was a plate chiller type, and happened to be a 3 beverage chiller with only two taps being used. It included a 20lb C02 tank (almost full!), regulator, jockey box, blue tub, an empty pony keg shell, and extra fittings.

If you don’t already know what a jockey box is, I’ll bet you’ve seen them at brew fests, music festivals or fairs, etc. Here’s a picture:
Jockey Box Home Brew

Basically it is an Igloo cooler that has either a cold plate or a stainless steel coil inside. The plate/coil is surrounded by ice and as beer passes through the plate/coil, it is chilled to serving temperature. The keg of beer need only be kept at about 50-60 degrees – the jockey box will take care of the last 10-20 degrees. On a hot day, that is a big savings of ice! It is also convenient because you can provide taps to make serving easy. It’s a great way to serve a lot of beer with less ice, and elevate the taps a bit to make serving more convenient and potentially less messy..

Two corny kegs are on the left sitting in the blue plastic tub. Right behind the tub you can see the regulator and C02 tank peeking out. There was a simple ‘T’ in the C02 tubing coming out of the regulator:
Jockey Box Fittings Brew

With a small investment in plugs for the 3rd beverage openings and replacement fittings for corny kegs I’d be ready for our big open house, Thanksgiving, New Years…well, you get it. Any party in the future. I got the fittings from my LHBS.

Heres a shot of the inside of the box:
Jockey Box Inside Home Brew

On the outside corners of the plate you can see the unused 3rd tap. The plate is aluminium on the outside, and it encases stainless steel tubing on the inside. It’s surprisingly heavy. Warm beer goes in the clear tubing, passes through a lot of stainless steel tubes inside the plate, cools off, and comes out the black tubing to the tap.

Before using, I needed to cut off the Sanke fittings:
Jockey Box Sanke Fitting

I also needed to plug up the 3rd beverage pass so that it would stay unspoiled in case I wanted to install a 3rd tap someday.

Here’s what the plug and washers look like:
Jockey Box Plug 3rd

Once installed:
Jockey Box Installed

In the picture above, the two tubes are the warm beer input tubes, the outside the the 3rd beverage plug.

When using a plate type jockey box, you want ice to cover the cold plate, but you DO NOT want the plate submerged in water. A coil jockey box can be submerged in water, but not a plate. Always keep your Igloo cooler drain open if you have a plate. You can see the grey bucket to the right of the box on the floor to catch water draining out of the cooler.

After replacing the fittings to accommodate corny kegs, I thoroughly cleaned all inputs using Beverage Line Cleaner (BLC). I did a quick test the week before the party to see what pressure delivered a good pour. It was different than my picnic tap.

The jockey box worked great at our fall open house and Thanksgiving. We’ll use it late this year for another gathering.

Pros:

  1. Less ice – like ½ as much needed. Instead of 30-40 lbs to get the kegs cold before, I was able to get by with 20 lbs or so. It was cool enough that I didn’t need to fill the Igloo much. I just stacked ice on top of the plate and put a drain bucket below the cooler drain hole. The rest of the ice went in the blue tub to keep the two corny kegs cool. My serving temperature was about 39-40 degrees. It poured beautifully all afternoon and evening. I added some ice on the plate halfway through the party when the Hefe started foaming too much. (If you’re curious, the other beer was Jamil’s Evil Twin.) During the winter months I wonder if I’ll need ice at all…
  2. Better serving arrangement. We had almost 70 people at our fall party. Having taps made it quicker for people to serve themselves. It also made for a consistent and beautiful pour – since the taps were stationary and weren’t being moved around like a picnic tap, I could truly set it and forget it. Less wasted beer from foamy pours due to people moving the picnic tap or being tempted to mess with the pressure, etc.
  3. It looks more neat and finished, and I think it generated less mess.

Cons:

  1. The box is surprisingly heavy. Not awful, but it isn’t super light.
  2. You still need to bring CO2 with you to dispense.
  3. If it is hot, you still need to chill the kegs some.
  4. You need to use BLC to clean the lines after use and before storage.

Next I’m going to experiment with a paintball can adapter fitting to see if a canister can push a keg or two. That would make it so much easier – no big CO2 tank to lug around, and the paintball can and the regulator can sit in the cooler for transport.

Also, it’s important to run beer though the lines and out the tap BEFORE putting ice on the plate. If you used water to clean the lines or water with BLC or similar in it, you might freeze up the BLC in the plates and you wouldn’t be able to serve until the iced BLC melted back to liquid. The order is: drain cleaning fluid/water from you lines and out the tap until you see beer, add ice to plate/coil, and serve.

It was a great buy and it made our fall gatherings easier to host. If you have a lot of parties or attend parties and need to serve a lot of people, a jockey box might be a good alternative. Who knows – you might score one on Craigslist like I did – good luck!

Post by Brewer kcpup


Infographic: How Far Will Home Brewing Take You?

Friday, December 21st, 2012

Brewing is a truly awesome hobby that hooks people for many reasons. First off, a side effect of pursuing this hobby is having lots of delicious beer on hand!  But that is just the beginning.  The wide range of beer styles, yeasts, and brewing processes means there is always something new to explore.  Brewing can be a way to challenge oneself. Highest quality beers take balance, experience, and attention to detail.  There is also a powerful do it yourself (DIY) geek factor to brewing. Equipment and gadgets start with simple plastic buckets and grow to fully automated brew rigs with lights, switches, pumps and burners.  Brewing your own beer is practical, in that the price per bottle can be much lower than store bought beer and avoids tax! Competition in brew club events, state fairs, brew fests keep brewers coming back for more.  Brewing can even turn into a career, either as a pro brewer or in academics.  And let’s not forget hops – the spice of beer that provides bitterness, aroma, and flavor like none other. Home brewers can knock their palates silly with extremely hoppy brews!

To capture our passion for home brewing and share it with the world we created the following infographic.

How far will home brewing take you?


how far will home brewing take you infographic


Removable and Reusable Labels for Home Brew Bottles

Friday, October 5th, 2012

The other day I realized, my home brew bottles are naked! They don’t have fancy labels like all those commercial beers do… I hope they don’t feel embarrassed when I take them to a friend’s house. I’m lazy and just write one or two identifying letters on the cap with a sharpie. H = Hefe, PA = Pale Ale, S = stout, etc… It’s ghetto but it works.

Why I don’t normally label:

A) Labels take time to make.

B) Since I re-use my bottles, that means eventually having to peel off the label. With a standard label, that requires warm water, soap, a scrubber, and some elbow grease. What a pain!


The solution I would need for it to make sense to label my home brew more often:

A good looking label that goes on and stays on, but then easily peels off and can be reused multiple times. Here comes BeerClings to the rescue! The owner of Beer Clings contacted us about their product and sent us a free sample to play with. Pretty neat idea, and it really makes that naked home brew bottle look ready for a night on the town. The label stays on great – even weeks later! It peels off easy, and goes back onto the original sheet with out a problem.

home brew removable labels beer clings

beer label home brew

reusable beer label

The makers of the Beer Cling are well aware they need to come out with lots more templates, and allow brewers design their own logos.


There are two aspects to labeling:

One is the aesthetic component. Home brewers are proud of their beer (at least the good batches). Decorating the bottle with a label is a nice touch. We’ve tested doing wax seals on the caps, that is fun but a bit of work. BeerClings helps to address this, and once they get more patterns to choose from, for only $5 per sheet, I think they will be in a great niche.

The second component to labeling is record keeping. Knowing what is in the bottle is good. Especially if you are taking it to a club and passing it around.  Knowing the IBU, SRM, ABV, OG/FG, style, and who brewed it is even better! This goes for Kegging beer too! I use post it notes to keep track of which keg is which, again the bare minimum. It would be nice to have the ABV and IBU on a label posted right on the keg (or by the tap).

How we are going to support labeling:

Here at Brewer’s Friend, we are looking into supporting label making in some fashion. There is a thread in the forum going on about labeling. There are several links in there and ideas from fellow brewers on how they label their bottles.

At the very least, the recipe editor should have a button to generate text from the recipe that can be copied and pasted into Word or Open Office. It would be nice to include the recipe name, style, and stats like IBU, SRM, ABV, etc.  I just ordered a set of Avery removable labels to play with. That would be best of both worlds – the ability to print whatever you want on the label, and the ability to remove it easily when the bottle is empty.


One last thing I thought was cool, BeerClings also makes these wooden prohibition style crates (I want one):


reusable beer label


Post by Brewer Larry


Homebrew Summer Shandy

Saturday, September 1st, 2012

For a refreshing twist on home brew, try something called a shandy – beer mixed with lemonade, ginger ale, etc.

It has been a blistering summer where we live. I was over at a friend’s house recently. She pulled out a Leinenkugel Summer Shandy out of the fridge and poured me one. It was pretty good – not great – but good. Later that weekend, our next door neighbor handed me a homemade shandy with Boulevard Wheat and lemonade.  Much better! Still a bit sweet, but much better.

I had a keg of wheat beer in the keezer and I had promised to bring some homebrew to a party. Inspired by these weekend quaffs, I set out to craft some homebrew shandy using a wheat beer as a base. (In this case, it was a hefe-like wheat beer.) Here’s a link to the recipe, but I used 2 row instead of pilsner…that’s why I say it was hefe-like…

Often shandys are made with wheat beer. Radlers are made with lager. Not a hard and fast rule, but typically the case. Different countries have different traditions of mixing other liquids/juice with beer. Here’s a link to an interesting article about these traditions and other beer cocktails.

Ok, back to the story…

I’d recommend you start with some lemonade you like. We have a Trader Joe’s around the corner, so we drink a fair amount of their lemonade you get in the frozen section. The price is right and it’s tart and tasty. Don’t skimp too much here…it will be a significant contribution to the flavor.

There are two basic “dials” you’ll be adjusting to get your shandy where you want it:

1. The flavor of the lemonade (how concentrated you mix it)

2. The proportion of beer to lemonade

I’m not going to spend a lot of time on the first “dial.”  This is largely a matter of taste – we typically make ours a bit more concentrated than the instructions on the Trader Joe’s frozen lemonade can. If you try my steps below and you’re still not thrilled, remember that you can modify the lemon flavor with a more/less concentrated lemonade.

I recommend that you work in small quantities to get your desired flavor profile identified. Here’s what I used to dial in my shandy:

measuring shot glass


After mixing up my lemonade, I began by testing with 1 ounce of beer and then X ounce (or fraction) of lemonade. By using small quantities, I could make up samples quickly, not fill myself up, and most importantly not waste homebrew!

I’d recommend starting at a 1:1 ratio (half beer, half lemonade). Many people like it around that proportion. For this batch of shandy, we preferred a 2:1 ratio (beer to lemonade). We liked it more “beery” than “lemonadey” in flavor. My guess is that when I make it again, I’d likely use this same process. Depending on the batch of homebrew and the batch lemonade the proportions would change.

Here’s a shot of my homebrew shandy:

summer shandy with home brew


On to packing for the party – I put the shandy in 64 ounce soda pop PET bottles. Twenty-one (21) ounces was about ⅓ of that measure, so I put that amount of lemonade in the bottle, then filled the beer in on top of it. That mixed the two together nicely. It made it easy to transport, cool, and serve at the party. People who don’t typically like beer liked the shandy. They went through about 3 gallons during the evening. Next time you want to try something different, try your homebrew in a shandy or radler. Cheers!


Big Hops Climbing the Shed

Saturday, August 11th, 2012

The hops are really climbing up the shed! Chinook and Fuggle are growing the best in the middle. Only two year old vines, I’m pleased and can’t wait to brew!

Next year a trellis is going up to keep the hops off the siding. It will look nicer, and be better for the siding on the shed. One thing I did not anticipate is how close the hops are getting to the porch light. Earlier this summer one of the leaves was touching the light bulb when the motion detector switched it on. It didn’t catch of fire thankfully, but it was withered and was dead the next morning. There is enough foliage now I think this hop plant is a real fire risk. So… in the mean time that light is shut off.

hops growing up shed wall

Here is how it looks from inside the shed:
hops through the window

Check out what was on one of the leaves:

hops leaf insect egg infestation

Bastards! These bugs seem to be gone, and I saw lots of lady bugs chomping away. Spider mites are the next big issue to worry about. I’ve been playing around with a hops spray program. I’ve tried various spray strategies, but the notes are not solid enough for a write up yet. We’ll see how the organic, non-toxic stuff does first.

Looking forward to harvesting and doing some home brewing in a few weeks!

home brew shed covered in hops


Beer Drinking is a Skill

Saturday, March 24th, 2012

For fun we just posted a tasting sheet we started using around here at parties. This tasting sheet is designed for all skill levels of beer drinkers. YES friends, beer drinking is a SKILL. Guzzling beer is even a skill in certain international sports, as featured and proven in the movie Beerfest! Make sure to turn the boot at the end.

Beer drinking skill comes into play when we start to analyze things like appearance (color, clarity) smells (hoppy, tanic?), after taste (too bitter, malty, sweet?).  Everybody has to start somewhere, and at most parties we have a mixed bag of skilled beer drinkers, macro drinkers, and the beer oblivious. To unite them all in a night of fun, this brew sheet comes to the rescue!

Click Here To Download the PDF Beer Tasting Party Sheet

beer tasting sheet for party


Evaluating a beer goes like this:

  1. Appearance
  2. Smell
  3. Taste
  4. After Taste
  5. Drinkability
  6. Overall Score

For my first use of this sheet, we had my Blitz Clone which was done as an 11 gallon batch (half fermented with Safale American Ale US-05, and half with Wyeast American Ale II 1272) vs the likes of MGD, Keystone Light, and Hams!  What fun!  It was OBVIOUS that the home brew was better to all who attended, even those who swear by Coors Light, which was a big compliment to the brewer.  Here’s to you having fun with this tasting sheet at your next party.

PROST!


The Beer Tool – Cool Bottle Opener

Saturday, February 11th, 2012

When I saw this bottle opener I thought, dang, that is a cool idea!

wrench beer bottle opener

Quote from the product:
Like most great ideas, the Beer Tool came out of a problem. Being tired of having to use the wife’s bottle opener to crack a cold one the decision was made to come up with something tougher, stronger, and more manlier. A few hours later the original Beer tool was born and there was much rejoicing.

The Manliest Bottle Opener You’ll Ever Own

https://www.thebeertool.com/

There is something that just feels right about it. Works effectively and people get a kick out of it!

wrench beer bottle opener

They come in different sizes, so make sure to get the size you want. In this case I think bigger is better.
 

Disclaimer: TheBeerTool provided Brewer’s Friend with a complimentary opener.


Want no ads? Go Premium and unlock all our brewing tools!