Equipment - Brewer's Friend - Part 5

Archive for the ‘Equipment’ Category

Boot Shaped Beer Glass

Saturday, February 14th, 2009

Ever since I saw the movie Beerfest, I wanted a boot shaped glass to drink out of. That day has finally arrived. This was a Valentine’s day gift to me from my wife. She is great! It has a Bavarian crest on the front, suitable for the home brew German lagers I intend to load into this sucker.

german beer boot glass

The beer boot says it is two liters, but it holds more than that. To the top it almost holds three quarters of a gallon which is closer to three liters. In terms of 12 ounce bottles, we are talking over a six pack worth of carrying capacity in one glass. PROST!

boot shaped beer glass

If you chug beer out of this glass with the toe pointed up, an air bubble will form causing beer to splash in your face. Towards the end of the night when things are nice and loopy, I can see this design feature being the source of many a good laugh in pubs that serve beer in a boot. The correct drinking technique is to point the toe to either side, instead of up or down.

The movie Beerfest explains the use of the beer boot in detail and it is worth watching at least once.


Building a Mash Lauter Tun Copper Manifold

Thursday, January 29th, 2009

There are three main categories for mash tun manifolds: Wire mesh tubing, Copper or CPVC manifold, and a false bottom. This article will explain how to build a copper manifold and hopefully save you a few trips to the hardware store.

A copper manifold installed in the bottom of the cooler will allow wort to drain evenly without clogging or picking up the husks from the grain. First buy your cooler and install the bulkhead valve. Then you can start thinking about the design of your manifold and how many elbows, T’s, and other parts you will need. For this one, it was about seven feet of 1/2″ copper tubing, 5 elbows and 7 T’s. Do not solder the joints, you will want to be able to disassemble and clean it out. One thing I found out about the copper parts is, some are setup to slide over the 1/2″ pipe, and others are exactly the same diameter as the 1/2″ pipe. Make sure to note this when picking up the materials (get the ones that slide over, these are the larger kind). On my first manifold, after I got home I had accidental wound up with a few elbows that wouldn’t side over the pipe.

The finished copper manifold:
mash tun copper manifold

To cut the pipe to length I used a hack saw. I removed the burrs with a file and washed all the parts with a scouring pad and warm water. When everything fit together I then made the slits in the bottom.

Slit Detail:
mash tun copper manifold slits

For cutting the slits, my band saw came in handy. The slits are about ½ inch apart and go half way through the pipe. Be careful using power tools for this and make sure you have not been drinking alcohol before hand! I spent some time deburring the inside of the pipes to get off all the residual copper bits. Banging it on the garage floor a few times removed the last hanging pieces.

Completed Underside:
empty mash tun

Each cooler is going to be a little different and there is no perfect design. The main thing is to shoot for even drainage. Secondly, try to minimize the amount of wort left behind inside the cooler after it drains. This is called dead space. There is always loss of sugars due to dead space. The kettle has the same issue. All home brewers have some dead space and it is not a big deal. Recipe software will compensate for you.

CPVC is another option for this style of manifold.  Lots of people use CPVC as you can find by googling CPVC mash tun. Do not weld the CPVC either since it also needs to be disassembled for cleaning.


Bulkhead for Cooler style Mash / Lauter Tun

Monday, January 12th, 2009

If you are converting a cooler into a mash / lauter tun this guide will show you how to install a bulkhead and ball valve. On the outside of the cooler, a ball valve attaches to a bulkhead. The bulkhead passes through the wall of the cooler. On the inside it connects to the manifold or braid so the wort will drain in a uniform fashion, with the flow controlled by the ball valve. Nuts and washers on either side of the bulkhead pipe (called a pipe nipple), compress against the walls of the cooler and form a water tight seal. Be warned, this is a fair bit of work to get done and may require several trips to the hardware store.

The bulkhead looks awesome when it is installed. It is something you can be proud of. The first time you open the ball valve to drain wort it is exhilarating, like that first ever sip of home brew. Your friends will be amazed by your dedication to the art.

The finished product:
mash tun ball valve

mash tun bulkhead inside

The first step is drilling the hole in the cooler. For a 1/2” nipple make a 3/4” hole.

mash tun bulkhead inside

In this design I am not using nuts to tighten down the washers. By choosing a very short nipple, the ball valve and the copper converter act like nuts compressing the washers against the walls of the cooler. I added some silicone sealant underneath the washers and inside the opening before assembling, then wiped away the excess after tightening.

mash tun bulkhead inside

Test assembled:
mash tun bulkhead inside

You will need to improvise based on what is available at the hardware store. The hardware guys will look at you like you are nuts when you try to explain what you are doing. A quick note about metals, I would not use anything but stainless steel, copper, or brass for the bulkhead. Palmer’s book How To Brew, has a lot of great information about using metals in the brewery.

On the end of the ball valve, you can convert to vinyl tubing easily with a barbed hose fitting.

Tools:
Drill
3/4” hole saw, spade bit or forstner bit
Medium size crescent wrench
Channel locks

Materials outline:

Ball valve – accommodating 1/2” pipe, stainless steel or brass
1/2” brass or stainless steel pipe nipple, short as possible for your cooler – usually 1”
2 stainless steel washers
Rubber washer for outside
Pipe thread to copper converter
Silicone sealant

One place you can get the parts online is https://www.mcmaster.com/. They are expensive, but this site has everything under the sun, including stainless steel parts.

There is one alternative to the bulkhead approach if you are using a cooler. Some people siphon wort through an outlet in their manifold. I find siphoning to be a clumsy approach. The wort is HOT (around 165 F) so you don’t want to be handling it. I have also seen plastic valves instead of the copper ball valve which attach to a hose.

This site has a related article on how to build a copper manifold for this cooler.

You are welcome to ask questions by commenting below.


Choosing a Kettle for All Grain Brewing

Saturday, January 10th, 2009

If you are going all-grain, you are likely a pretty serious brewer. Eventually you will want to do 10 gallon batches. Even if you are not ready for 10 gallon batches, when going all-grain, it is recommended to jump straight to the 15 gallon size kettle. With a 10 gallon kettle you are limited to 5-7 gallon batches. The 15 gallon kettle is only about 20% more in price over the 10 gallon. It is worth the extra expense now. Otherwise you will have to buy yet another kettle when you are ready for 10 gallon batches.

15 gallon kettle for beer

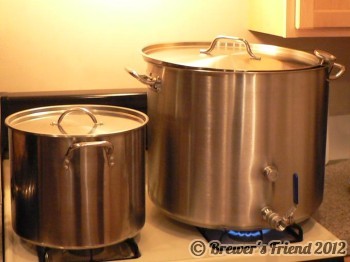
This 15 gallon kettle covers both the front and rear burners on my gas stove!

A 15 gallon kettle is needed for 10 gallon batches for a couple reasons. Keep in mind with all grain brewing, it is a full wort boil. The original amount of wort collected is above the final amount that goes into the fermenter because of losses due to evaporation during the boil. You also need to leave room in the kettle for the bubbling action of the boil.

Make sure the kettle has an out let for a ball valve:

stainless steel ball valve

This kettle also features a second outlet. A sight gauge or thermometer can be added later on. This one also came with a lid which I use when warming up water or after flame out to keep germs out while the wort chiller is going. These ones came pre welded. You can also buy bulkhead kits to add your own outlets, but be warned many trips to the hardware store may be in order!

Brew kettles are often advertised in quarts. At 4 quarts to a gallon, a 15 gallon brew pot is 60 quarts. This is a side by side comparison of my original 20 quart kettle which I started off with (on the left). The 15 gallon version is on the right. The old kettle is great for heating sparge water.

20 and 60 quart kettles


Glass vs. Plastic for Fermentation

Sunday, December 28th, 2008

There is a lot of debate out there regarding glass versus plastic for the fermentation vessel. It is really a toss up and comes down to personal preference.

Which is better, a glass carboy or a plastic bucket as a fermenter?

In terms of cleaning, buckets are way easier. However plastic buckets seem to hold the smell of the previous batch. Plastic can get small scratches in the surface from abrasive cleaning which can harbor germs. Plastic can also discolor over time.

Plastic Bucket

Carboys are more work to get clean on the inside compared to buckets. Glass stands up to more use because zero smells seep into its surface and it will last forever. Glass carboys are clear, allowing you to see what is going on inside.

5 gallon glass carboy

I avoid using plastic as a secondary fermenter because you want to avoid head space in the secondary. See this article for more about choosing the correct size secondary.

Stainless steel, the third option:

Commercial breweries use neither glass, nor plastic, and opt for giant stainless steel fermenters. For the home brewer, canonical stainless steel fermenters are super expensive, I hope get one someday. In the mean time, there is a simple and affordable third option for fermenting. Use a corny keg. Attach a blow off tube to one of the outlets and close the other by screwing on the quick disconnect. Pour the beer into the corny keg and seal the lid. Now you have a fermenter with a small foot print, ideal for lagering.


Pick the Correct Size Secondary Fermenter

Saturday, November 15th, 2008

Oxygen is the enemy of beer after fermentation. The main cause of oxidation in beer is exposure to oxygen when racking or bottling. Another culprit is the head space in the secondary fermenter. Make sure to use the smallest size secondary fermenter possible as not to expose the beer to oxygen in the head space. For example a typical 5 gallon batch should use a 6.5 gallon carboy or bucket as the primary fermenter, then a 5 gallon carboy as the secondary. There will be almost no head space in the secondary if done correctly.

Rules of thumb:

  • Head space is needed in the primary, since there will be a lot of foam during the krausen phase of fermentation. Oxygen in the head space is not an issue during primary fermentation because it will be replaced by CO2 when fermentation kicks off and any dissolved oxygen will be utilized by the yeast. Some will also be pushed out through the air lock with the escaping CO2.
  • Head space is bad in the secondary. Since the beer is fermenting slowly, it will take longer to push oxygen in the head space out through the air lock. This means most of the oxygen in the head space is getting into the beer and causing harmful effects.

Why is oxygen harmful in the secondary?

Oxygen (O2) is a reactive molecule. During primary fermentation the yeast use oxygen quickly as part of the metabolic reaction that produces alcohol. Inside the secondary the yeast metabolism has settled down greatly. This leaves any newly introduced oxygen free to interact with larger desirable molecules responsible for flavor and bittering. When the oxygen hits these molecules it splits them apart making for undesirable byproducts in the beer. Wet paper bag or cardboard taste is generally the telling sign of oxidized beer.


When to use a blowoff tube

Sunday, September 21st, 2008

For dark beers or beers with a specific gravity greater than 1.060, in my experience, a blow off tube is need to keep from having an overflowing mess.

Here is a picture of a porter that is only 24 hours into fermentation. You can see the amount of gunk on the glass in the head space got up to the airlock. I pitched two cups of slurry from a previous batch of English Pub Bitter and the fermentation took off like a rocket. In five hours the tube was making a tapping noise every couple seconds as it bubbled. The strain is White Labs British Ale Yeast.

Blowoff tube


Brewing Outside on Propane

Sunday, September 21st, 2008

Brewing outside can be a really fun experience. It saves time for a number of reasons. First, there is is less cleanup to do before hand and afterward. Second, the water boils a lot faster than on a stove. I have waited 45 minutes to boil 3 gallons on a gas stove, but with propane it is closer to 10 minutes. Another benefit is the smell of the wort is not kept inside the house, making it easier on your family *if* they don’t like it for some odd reason.

There are of course a few downsides. It is easier to get a boil over because there is so much heat going into the kettle. I am also careful not to burn ingredients on the bottom of the kettle. Propane can be dangerous to work around, so make sure the fittings are safe and the tank is secure.

Here is an image of me brewing some English Pub Bitter. There is under 15 minutes left as the wort chiller coil is already hooked up. For instructions on how to build a wort chiller, click here. Turning on the hose and letting it shoot the warm water into the lawn is fun and I used that water to rinse out the hops bags. Cooling with wort chiller took about 10 minutes!

brewing outdoors on propane

Make sure to check the weather ahead of time.


Do It Yourself Immersion Wort Chiller Instructions

Saturday, September 13th, 2008

After reading about the benefits of wort chillers and seeing the prices I took it upon myself to build an immersion wort chiller. It takes about 30 minutes and a trip to the hardware store. No special tools are needed beyond a crescent wrench.

An immersion chiller works by taking advantage of the cool underground temperature of tap water. Running tap water through the coil allows a heat exchange to occur, removing heat from the wort rapidly.

The entire setup cost me $66.70. That was about half the retail price on an equivalent model. I won’t go back to ice baths ever again. It cools a 3.5 gallon batch in about 10 minutes! It is a big time saver when brewing.

50 feet of 3/8 ” soft copper tubing was desirable because that length is good enough for 10 gallon batches in the future.

wort chiller

I wrapped the coils around a bucket so they would fit nicely into my kettle:

beer kettle

Make sure the supply side starts at the top and the return side comes from the bottom. This will help with the hot water convection inside the kettle.

The store had 20 feet and 30 feet, but no single 50 feet length, so I combined the two tubes into one with compression fittings. It was nice that no soldering was needed because I was concerned about the health effects:

beer kettle

The supply side uses a standard female garden hose attachment with a compression fitting:

beer kettle

When I use this indoors, I attach a pvc tube to the outlet side and use a worm drive clamp to lock it down.

wort chiller outlet
wort chiller clamp fitting

The final product, an immersion wort chiller:

beer kettle
beer kettle
beer kettle

NOTICE:
Make sure to test it out for leaks before using. You do not want boiling water and steam shooting everywhere when you are trying to make beer. Also be sure to clean it with a non abrasive cleaner to get all the grime from the factory off before dunking it into your wort. It will come out of the wort very clean because the heat scrubs off all the oils and tarnish. Cleaning took some trial and error. Vinegar did not work and left an ugly gray stain on the copper. What did work was lemon juice in hot water and some mild scrubbing with a dish rag.

To use, submerse in the boiling wort when the batch has 15 minutes left to sanitize the unit. Be careful, steam and hot water will shoot out of the in and out pipes. Hook up the hose and the pvc outlet tubing before submersing. When I brew outdoors, I don’t worry about the outlet tubing and point it away from my work area. For indoor brewing I put the pvc outlet tube down inside the sink so it doesn’t go anywhere. I have a converter for my utility sink which allows me to hook up the hose and run it into the kitchen. Your hardware store will have that too, I brought in the attachment for my faucet so I could get the correct size in one trip.


Per Batch Miscellaneous Item Costs

Sunday, July 27th, 2008

When calculating the cost of a batch of beer, it is easy to overlook the little items like sanitizer, bottle caps, clarifier, priming sugar, and specialty items like burton/gypsum salts or Irish moss. For those of us who keg our beer, don’t forget we have to pay for CO2 recharges every couple of years. For the time being most places in North America can take clean fresh water for granted, though some people do prefer to brew with spring water. No matter what, home brewing is STILL cheaper than store bought beer, because there is no marketing, packaging, labor, or transportation costs to deal with. Even if home brew was more expensive, it still tastes better and is more satisfying to drink.

Item Desc Cost/Batch
StarSan Santizier Use approximately 1 ounce (30 ml) per batch $0.95
Bottle Caps Estimate 50 (max) at $0.02/cap $1.00
Misc Ingredients
Burton Salts For English Ales, 1 ounce $0.20
Irish Moss Use ½ tsp per batch $0.20
Gelatin Use 1 tsp per batch $0.25
Priming Sugar – Corn Syrup 6 oz per 5 gallons $0.40
Priming Sugar – Light DME 8 oz per 5 gallons $1.75
Kegging
CO2 If you are kegging a 5 gallon batch $1.00
Line Cleaner $0.25
Kegging
Water? If store bought spring water used in beer (5 gal) $5.00
Carbon Filter wear and tear on filter $1.00


Want no ads? Go Premium and unlock all our brewing tools!