Equipment - Brewer's Friend - Part 2
Brew your best beer EVER. Save 10% on Brewer's Friend Premium today. Use code TAKE10. Sign Up ×

Archive for the ‘Equipment’ Category

Detailed Guide for Cleaning a Better Bottle

Tuesday, November 20th, 2012

A while back I posted about my Better Bottle blowoff setup. During my search for a good blowoff arrangement, I ended up calling the manufacturer of Better Bottles (BBs). The man I spoke with was super helpful and knowledgeable.

During that conversation, I decided to ask him about cleaning. The main reason I brought up cleaning was that I commonly have a 1-1.5 inch line of fermentation “gunk” that forms at the top of the BB right before it begins to taper to the neck. This line forms on the top band of the BB. Since I often leave my beer in the primary for 3 weeks, that gunk can get pretty stuck on there. Also, the bands on the BB are textured, and the texture makes gunk stubbornly adhere sometimes.

My primary cleaner is OxyClean, so with that in mind here’s the information he shared with me a few years ago. I’ll then share my cleaning regimen, modified after my conversation with the BB company plus a newer step for the most stubborn of stubborn gunk!

Better Bottle cleaning advice direct from the company:

  1. The BB Guy said OxyClean can be used, but you’ve got to be careful – it’s powerful stuff. Don’t pour the powder directly in on the plastic. First put in the Oxy in water to dissolve it, when pour it in. Ensure that any Oxy concentration rate is low – read the package. I actually make mine a lower concentration than the “general cleaning” amount on the box…it cleans up my BBs fine. What I do is put my Oxy in a bit of warm water, dissolve it and pour it in the BB and swiftly fill it up to my desired level. The BB Guy explained that the reason you want to be careful with Oxy is that high concentrations of Oxy over a period of time may weaken the bottle. He also didn’t recommend soaking in Oxy for more and a few hours at the most…not overnight.
  2. BB Guy cautioned about using super hot water – don’t do it. It won’t melt the bottle, but over time it can weaken it. He said to use water you can comfortably put your hand in. I’m typically a “blazing hot” water washer type, so I backed off.
  3. BB Guy had a great suggestion about getting that fermentation gunk off: put a soft washcloth into the bottle with some water. Swish it around and the washcloth will pull the gunk off.


Here’s my BB cleaning regimen along with some photos:

First, let’s start with a dirty carboy I just racked from – this is with NO rinsing of any kind, just poured out the remaining liquid after racking to my keg:

dirty better bottle after fermentation

Check out all that gunk on the textured band and all the way up to the neck of the carboy – this is from WLP002, a big top cropper!
dirty better bottle after fermentation detail

Detailed cleaning steps:

  1. I rinse them out with warm water and leave some warm water in there (about .5 gallon).
  2. I put my orange carboy cap on top and shake the heck outta the bottle. This “water scrub” takes off a good portion of the gunk. Here’s what’s left after that vigorous shake – loads better, but not clean: cleaning better bottle carboy
  3. I put in a small squirt of Ivory liquid dish soap and put about 1.5 gallons very warm water in. I replace the carboy cap, and invert the carboy on a bucket with a hand towel on the lip. The towel keeps the BB from sliding into the bucket. I’ll let it soak for a while…sometimes a day. I used to do this with Oxy, but after my conversation with the BB guy I made switch to Ivory soap as change to my process. soaking better bottle upside down
  4. I dump out the soapy water and rinse out the BB. I inspect it carefully to see if there’s some gunk still present. About 60% of the time, there are some scattered gunk spots left.
  5. If there’s remaining gunk, I do the Oxy soak. I invert the BB like step #3 above and leave it for an hour or two only to reduce chemical stress on the BB per the company.
  6. Still remaining gunk? If yes, then I pour out most of the Oxy water and leave about .25 to .5 gallon in the BB. I put my washcloth in there and swirl it around. Most of the time the BB is inverted/partially inverted with carboy cap on top and I’m spinning it around. It works well, and most of the time my BBs are clean at this step. Here’s the amount of water and my designated cotton BB washrag: partially clean better bottle home brewing
  7. Gunk not gone yet? Often, this is with wheat beers and aggressive top croppers. That’s when I pull out the heavy artillery – the Carboy Cleaner. I had some anxiety about using these…would they scratch the plastic? The BB Guy said not to use brushes for this very reason. I wrote the Carboy Cleaner company and got a prompt response – yes other people use them for BB’s. No there are no surfaces on the cleaning arms that could scratch the plastic. I decided to give them a try. They work great! I use OxyClean water and a few passes takes care of it. However, I am cautious and don’t want to invite trouble and that’s why I use them as the last resort/ Typically that’s about 20% of the time. Before each Carboy Cleaner use on a BB, I check the cleaning arms carefully. I check the edges to ensure the plastic inside the arm that provides the necessary rigidity isn’t peeking out and I check the stitching to ensure the plastic “thread” isn’t coming unstitched. I’ve had the same Carboy Cleaner pads for 2 years now, and haven’t yet had to switch to the extra, replacement pair that came with them. One other thing to mention – if you decide to purchase a Carboy Cleaner for BB’s, tell them you use BBs when you purchase. He sent me the appropriate drilled stopper to work with BB’s! Great service. By the way, I have NEVER had a BB that couldn’t get 100% gunk free after this step.
  8. Rinse and let air dry. The BB Guy said to dry them on their sides…it will go faster. I tried it and found that I agree. Shake as much water out as you can and set it on its side. More water will pool at the bottom. Keep shaking it out and in a day or two it will be dry. In this specific BB cleaning case, it was clean by Step 6 – here’s the final product – all clear! dirty better bottle completely cleaned
  9. I put a piece of clingwrap on top of the opening to keep dust from getting in BBs during storage.

So that’s my Better Bottle cleaning regimen. With the addition of the Carboy Cleaner on the most stubborn fermentation remnants, I’m now confident that I can safely clean BBs no matter the gunkage!

Post by Brewer kcpup


Draft Beer At Home – Keezer Build With Collar

Tuesday, October 16th, 2012

Close your eyes and imagine your personal in home bar, complete with a draft system, stocked full of home brew!…. Congratulations! You are thinking of a Keezer! Here’s how to build one:

What the heck is a keezer?  Very simply, a keezer is a chest freezer that has been converted into the ultimate refrigerated beer serving chamber!  Keg + Freezer = Keezer.

Why does it have to be “converted”? Chest freezers often lack the height inside to comfortably accommodate 5 gallon cornelius kegs and the associated draft plumbing. There is a hump inside for the compressor that eats up a good amount of floor space. Even more important to note is that these freezers have extensive plumbing running through the walls of the appliance. Do you REALLY want to drill through the wall of a freezer to install a shank and hope that you do not ruin your freezer? Probably not.

The basic process for building your Keezer is to install a wooden collar on top of the keezer (below the lid). That extends the Keezer’s internal height, allowing it to hold more corny kegs, and providing a place for all the taps to go.

This project is fairly easy to accomplish and requires few materials to complete. In one afternoon, you can easily convert an old chest freezer into a keezer, which will reliably cool and serve your homebrew for years to come.

What you will need:

  • Tape measure (measure twice, cut once!)
  • Circular saw (to cut your lumber to length)
  • Lumber (this will vary on the height of the collar you wish to build, 2” x 6” is a good start)
  • Power drill (for drilling pilot holes, shank holes and installing screws)
  • Wood screws (for building the keezer collar)
  • Construction adhesive (to seal the gap between the wooden collar and freezer lid, as well as attach the freezer lid gasket to the keezer collar)
  • Hole saw (for drilling holes in collar for the shanks)
  • If you don’t already  have one, a temperature controller for your freezer chest to keep the beer at serving temperature (as opposed to freezing it).
  • We highly recommend getting a moisture absorption product for placement inside your keezer to avoid condensation and eventual mold build up.

Steps:
#1. Remove the lid from your freezer, this will make measuring and fitting the collar that you are about to build, much easier. You will also want to REMOVE the hinges from the lid, as soon they will be mounted to the collar, allowing the lid and collar to swing up and out of your way when you open the keezer.

#2. Remove the rubber gasket that seals the lid to the freezer when the lid is closed. You will not need it on the lid after building the collar, and you will want to use this on the base of the collar, or the ledge of the freezer, to properly seal the collar to the freezer when it is fully assembled.
You’ll want to re-use the gasket from the lid. Be sure to use the measurements of the gasket (perimeter) to determine the size of your collar (perimeter). This will assure that you can reuse the gasket, and assure that you will have a collar that is capable of providing a proper seal. In essence, build your collar so that the dimensions match that of the gasket you previously removed from the lid.

#3. Be sure to measure properly and take into consideration blade kerf when cutting your lumber to length. For a nice clean build, be sure to cut your (4) sides (8 ends) using 45 degree angles so that you have no end grain showing when the build is complete.

starting keezer collar build

#4. Secure all four sides of your keezer collar by drilling pilot holes and installing two wood screws in each corner. For added strength, you can also opt to add corner gussets to strengthen the structure. Keep in mind that soon you will be attaching this collar directly to the underside of the freezer lid that you removed in Step #1 which will provide some inherent structural stability.

keezer collar wood

keezer miter corner

At this time, you can utilize a hole saw to drill the holes that will accommodate the shanks for your taps. This can also be reserved for later. You can also sand, stain, laquer or otherwise prepare and preserve the wooden collar. This will not only protect the wood, but it can also add an aesthetic dimension to the keezer as well.

keezer collar stained with holes

#5. You must secure the collar to the underside of the lid of the freezer. This can be done with a combination of “L” brackets and construction adhesive. Both will provide excellent holding power, but the combination of the two will provide positive holding power as well as the ability to seal the area where the collar meets the lid with an air tight seal.

#6. Install the gasket that was removed from the lid in Step #2 to the bottom edge of the collar, or the ledge of the freezer. This can be accomplished with the use of a good construction adhesive.

finished keezer

#7. Finally, you will want to mount the hinges that you removed from the freezer/freezer lid, to the collar itself. This will now allow the collar (and taps) to swing up and out of the way when you open the keezer for routine maintenance and cleaning.

finished keezer lid opens to show taps

finished keezer lid opens to show plumbing

This post was originally written by The Pol from HBT (one of the Brewer’s Friend authors) way back in 2009! We were cleaning out the archive and realized it had not been published. Doh!  The same facts hold true today about Keezers as they did in 2009.

Hope you enjoyed the article and are inspired to keg at home and build yourself one.


Removable and Reusable Labels for Home Brew Bottles

Friday, October 5th, 2012

The other day I realized, my home brew bottles are naked! They don’t have fancy labels like all those commercial beers do… I hope they don’t feel embarrassed when I take them to a friend’s house. I’m lazy and just write one or two identifying letters on the cap with a sharpie. H = Hefe, PA = Pale Ale, S = stout, etc… It’s ghetto but it works.

Why I don’t normally label:

A) Labels take time to make.

B) Since I re-use my bottles, that means eventually having to peel off the label. With a standard label, that requires warm water, soap, a scrubber, and some elbow grease. What a pain!


The solution I would need for it to make sense to label my home brew more often:

A good looking label that goes on and stays on, but then easily peels off and can be reused multiple times. Here comes BeerClings to the rescue! The owner of Beer Clings contacted us about their product and sent us a free sample to play with. Pretty neat idea, and it really makes that naked home brew bottle look ready for a night on the town. The label stays on great – even weeks later! It peels off easy, and goes back onto the original sheet with out a problem.

home brew removable labels beer clings

beer label home brew

reusable beer label

The makers of the Beer Cling are well aware they need to come out with lots more templates, and allow brewers design their own logos.


There are two aspects to labeling:

One is the aesthetic component. Home brewers are proud of their beer (at least the good batches). Decorating the bottle with a label is a nice touch. We’ve tested doing wax seals on the caps, that is fun but a bit of work. BeerClings helps to address this, and once they get more patterns to choose from, for only $5 per sheet, I think they will be in a great niche.

The second component to labeling is record keeping. Knowing what is in the bottle is good. Especially if you are taking it to a club and passing it around.  Knowing the IBU, SRM, ABV, OG/FG, style, and who brewed it is even better! This goes for Kegging beer too! I use post it notes to keep track of which keg is which, again the bare minimum. It would be nice to have the ABV and IBU on a label posted right on the keg (or by the tap).

How we are going to support labeling:

Here at Brewer’s Friend, we are looking into supporting label making in some fashion. There is a thread in the forum going on about labeling. There are several links in there and ideas from fellow brewers on how they label their bottles.

At the very least, the recipe editor should have a button to generate text from the recipe that can be copied and pasted into Word or Open Office. It would be nice to include the recipe name, style, and stats like IBU, SRM, ABV, etc.  I just ordered a set of Avery removable labels to play with. That would be best of both worlds – the ability to print whatever you want on the label, and the ability to remove it easily when the bottle is empty.


One last thing I thought was cool, BeerClings also makes these wooden prohibition style crates (I want one):


reusable beer label


Post by Brewer Larry


Chain Mail For Cleaning Stainless Steel

Saturday, September 15th, 2012

Yes, that’s right! Chain mail has a practical use in the brewery!

In addition to brewing, I enjoy cooking. In fact, I see brewing as an extension (a BIG one!) of my cooking. Early this year, one of my favorite cooking magazines – Cook’s Illustrated – reviewed a cleaner for cast iron. It’s called the CM Scrubber, and the CM stands for chain mail! It had been recommended by a few readers and the magazine’s editors decided to evaluate it. They liked it very much, and I ordered one immediately. After a bit of a wait (each is made in the US by hand, plus their orders exploded after the article) it arrived in the mail. Here’s what it looks like:

chain mail cleaner

We’re a mostly cast iron cookware house. It’s heavy but the even heating can’t be beat! I’ve been using it frequently on our cast iron. Knappmade, the manufacturer of CM Scrubber, mentioned it also works well on stainless steel cookware. I began using it for that purpose and was equally happy with the results.


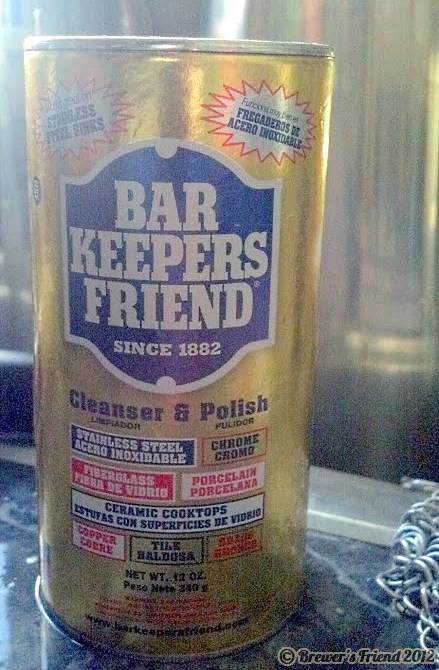
Recently I was washing my “well worn” stainless brew pot after a brew session. I had a moment of inspiration and decided to try the CM Scrubber and Bar Keeper’s Friend and see if they could shine my brew pot up a bit. If you haven’t seen it before, here’s what the label looks like:


bar keepers friend


A bit of history about this humble brew pot – I bought it used from a Craigslist ad. It had been well used by other brewers by the time I purchased it. There were dings and scratches when I bought it, and original owners of the pot used a “turkey fryer” type propane burner which leaves stains of its own.  I’ve had it for 3 years and use it on the stovetop about twice a month. Bottom line: well used with battle scars to prove it!


While I keep my equipment clean, I’m not obsessive about hot side brewing stuff looking absolutely perfect – a different story on cold side. I only spent no more than 5 minutes scrubbing on the bottom panel, absolutely less than 10 for the whole pot.


Here’s the “before” – I chose the bottom of the pot to photograph because it was the most stained compared to the inside.


dirty stainless steel brew pot


Using Bar Keeper’s Friend is easy, it sprinkles out like Clorox or Bon Ami that are packaged similarly. It’s a slightly cakey white powder. You add a bit of water and you scrub. Here’s the start of cleaning with the cleaner sparingly sprinkled on with just enough water to dissolve it. You can see some undissolved cleaner caked up on the lower right of the pot:


stainless steel brew pot


So, I scrubbed the bottom. I used some elbow grease, but not much is needed. As with my cookware, the CM Scrubber does most of the work. I used the last few minutes to scrub the inside out using the same process.


Here’s the “after” – much improved!


cleaned stainless steel brew pot


The inside of the pot was much improved as well! Based on the result I’ve now added a quick CM Scrubber and Bar Keeper’s Friend pot cleaning step to my routine. If you’re interested in learning more about the CM Scrubber, here’s a link to their website: https://www.cmscrubber.com/

Post By Brewer kcpup


Better Bottle Blowoff Tube

Saturday, July 28th, 2012

When I had been brewing about six months, I transitioned from glass to Better Bottles. These are PET plastic fermenters. I was hauling carboys up and down stairs from basement to kitchen frequently. Even with a Brew Hauler strap system, the breakage potential and resulting safety issue was hard for me to stomach. When I read a letter in Zymurgy from a brewer that nearly lost his hand due to a broken glass carboy, that sealed the deal and I made the switch. I’m not criticizing glass carboys for other brewers – I’m just saying they weren’t a fit for me and my brewing.

I quickly settled on Better Bottles, mainly because I loved seeing the fermentation and not having to open the container (like plastic buckets require). Even years later I still love seeing fermentation!

I brew a lot of Belgian Wits – this style is always on tap at our house. White Labs WLP400 is a climber! The first time I fermented a Wit in a 6 gallon Better Bottle I had a big blowout and resulting cleanup. I began combing the forums for how people made blowoff arrangements for their Better Bottles. There weren’t that many posts on Better Bottles to begin with, so it was slim pickings on advice. However, I did find a few posts that talked about  a #10 drilled stopper with plastic tubing running into sanitizer or your liquid of choice. I tried that setup, and for Wits and Hefes it still wasn’t enough – more blowouts and cleanups. I was back to square one.

After more research, I discovered that the manufacturer of Better Bottles makes a blowoff assembly specifically for the Better Bottle. The asssembly’s hole was a larger diameter than the tubing I had been using, so I ordered two and decided to give them a try.


Here is a photo of the blowoff assembly Better Bottle makes:

better bottle blowoff assembly


This is really nice, heavy plastic. There’s a teflon-coated o-ring that makes a secure seal, and you’ll notice that the opening is threaded.

This next picture highlights the reason for the threading – the blowoff assembly is made to work with a ¾ inch PVC fittings. See below:


better bottle pvc blowoff


The PVC pipe is a much larger diameter than the tubing I used to use. It is also really easy to clean and to sanitize because it disassembles. Here’s a shot of my setup fully assembled (this photo was taken after I’d done cleanup, hence the empty fermenter, etc.):

beer brewing blow off setup


What I like about using the milk jug is that I can put some water in it to settle just under the PVC pipe, plus it has a wide bottom that makes it hard to accidentally knock over. During the summer I occasionally have issues with fruit/vinegar flies hanging around my fermenters. By the milk jug having a narrow neck and by adding water to a level just under the PVC pipe, I can prevent flies from getting into the fermenter. I get the benefits of an unrestricted ‘open type’ fermentation – no back pressure from liquid in an airlock or other container, and I also mitigate the risk of contamination.

One important note: if you have ‘Vintage Shop’ brand PET bottles (they look similar to Better Bottles without the bands – they’re smooth) the blowoff assembly does not fit solidly in the neck. It covers the opening completely, but the neck does not have a rib that will hold the o-ring.

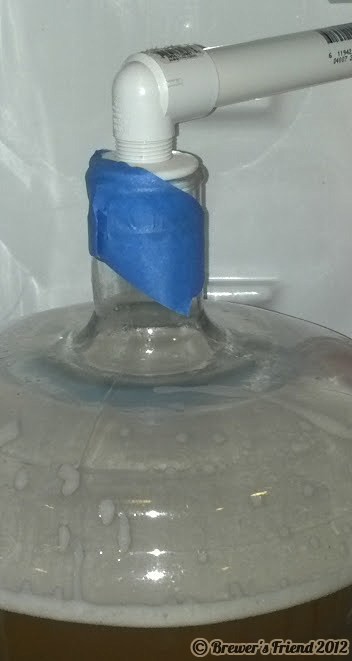
Here’s how I use the blowoff assembly with the Vintage Shop brand…painter’s tape holds it:

pvc blowoff tube


I have had great success with this arrangement and don’t have to worry anymore about cleaning up a blowout. If you use Better Bottles and use yeasts that are heavy climbers or aggressive top croppers, this blowoff rig could be a useful addition to your setup.

Post By Brewer kcpup


BIAB Custom Bags You Can Order

Saturday, June 23rd, 2012

Looking for a custom made brew bag for doing BIAB? Check out this article. If you don’t know what BIAB is yet, check out our previous article for complete details on BIAB.

But where can I buy a BIAB bag?

Finding a suitable bag has been a long standing problem. The multitude of kettle shapes and sizes makes it difficult for manufacturers to mass produce these bags. From a DIY perspective, finding the right fabric and then getting someone to sew it up takes a lot of time and effort. These issues and the general lack of availability for a ready made BIAB bag is why I never personally tried BIAB.

The good news is, the team at Brew Bag will make you a custom bag. The price is only $35!

BIAB brew bag

The folks at Brew Bag are really nice to work with. They go to the trouble of understanding your situation and they make sure you get what you need.

The bag is built to last and has nice handles. The first time you get the bag it needs to be washed in Woolite or a light bleach solution on the delicate setting.

I must say, BIAB is a great way to brew! There is less equipment to deal with. The brewing process is simpler because all the mash water is added up front. It is fun to setup a rope and pulley to hoist the bag when it drains. I highly recommend BIAB for home brewers looking to go all grain for the first time. With BIAB the mash tun and HLT are not needed. All that is required is a sufficiently large kettle (5 gallon batches need roughly a 10 gallon kettle). A false bottom is also needed.

An easy BIAB false bottom:

The bag should never touch the heating element or the bottom of the kettle. No matter what the heat source, some sort of false bottom is required with BIAB. Jeff at Brew Bag suggested I go with a DIY pizza pan with legs.

home brewing kettle false bottom DIY

This false bottom is built from a $8.39 aluminum pizza pan, and 4 stainless steel screws.  It is a bit flimsy but it works. Central Restaurant has pans of this style in just about every size.

Here are some images from the brew day:

Summer Citra Kölsch (an experiment)

(By the way, the brew feature at Brewer’s Friend flawlessly calculated the mash water volume needed and allowed me to calculate the strike temperature with ease. BIAB is fully supported by the Brewer’s Friend recipe editor and brewing software.)

BIAB home brewing

home brew in a bag

home brewing in a bag

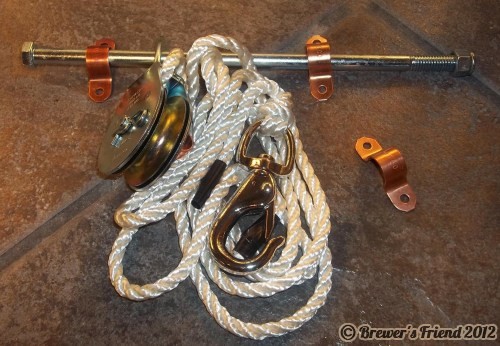
To lift the bag out of the kettle and let it drain a pulley can help. Turns out there isn’t quite enough clearance where the kettle is (but I can move it up to the mash tun position next time). For this batch, lifting the wet bag into a clean bucket and letting it drain there for 10 minutes worked well enough.

BIAB pulley

BIAB pulley

BIAB Considerations:

BIAB mashes thin. My brew was around 3.5 quarts per pound. This can lower efficiency.

Make sure to do a mash out step. Raise the temperature to 170F and rinse the grains thoroughly.

Mash for 75-90 minutes instead of just 60 to get better efficiency.

Compensate for the false bottom when measuring for the size of the bag.

There is more trub from the BIAB method. It is all settled at the bottom of the carboy.

If you go with a pulley system, make sure the rope can handle the weight of the grains plus the water they absorb. For a batch that has 10 pounds of grain, the bag itself when wet is probably closer to 20 pounds.

Due to capacity issues, high gravity beers may not be possible given your equipment. One way around that is to add extract to boost gravity for those occasional high gravity beers.


Brewer’s Friend was provided with a complimentary bag from Brew Bags.


Brew Shed Exhaust Fan – Need More Power!

Sunday, May 6th, 2012

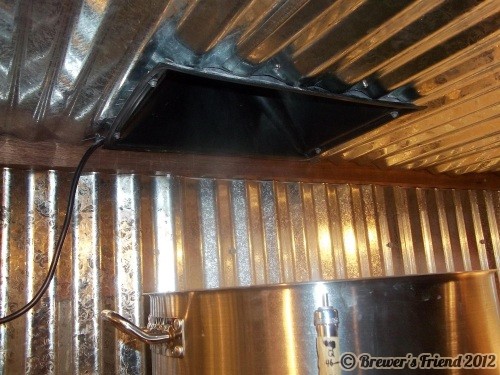
Choose your brew shed exhaust fan and ducting design carefully. My shed is exactly what I was after with one exception: the exhaust system. On wet days the condensation from the boil off can become a bit of a problem. Note that there are zero problems on warm days, but doing a 90 minute boil on a rainy day leads to this situation:

boil off brewing steam

I did a lot of research on fans in terms of price, noise level, and cubic feet per minute (CFM). The more CFM you want the more expensive they get and the more noise they put out. The ideal solution is a reasonably priced fan that can keep the room dry but not drive me nuts with racket. Going in I knew a kitchen hood fan like the ones that normally go over a stove would not be powerful enough.

electric brew kettle full boil

Where to find a powerful exhaust fan? It turns out exhaust fans are a big deal for ‘growers’ too. Their supply stores have several models to choose from. It felt a little strange ordering from one of these places. Thankfully, the shed has a sky light so big brother can already see what is going on in there.

After trying to find a balance between noise level, cost and CFM, I went with this:
Can MAX Fan 6″ – 334 cfm w/ Speed Contrl
https://www.bghydro.com/BGH/itemdesc.asp?ic=AEFCFMF06&Tp=
https://www.growwurks.com/can-fan-max-fan-6-3-speed-complete-control-334-cfm.aspx

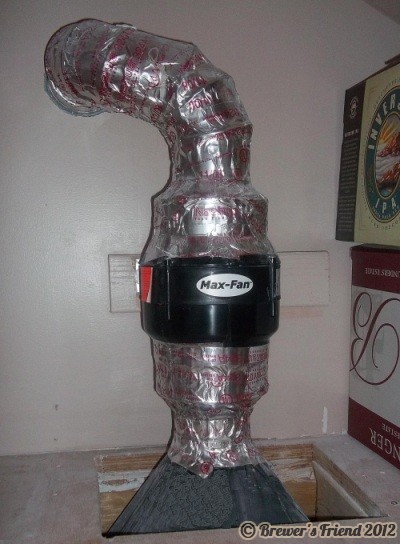
brew shed exhaust fan

The max fan is $150 before shipping. The noise level is tolerable and I thought 334 CFM would be plenty. It works fine for a 60 minute boil in dry weather. However, it is too weak to keep up with a 90 minute boil if the relative humidity is over 75%. What I ended up having to do a couple times earlier this winter was wrap a towel around the unit since there was so much dripping coming out of it. That works pretty well and has gotten me by until I have time to make a more permanent solution.

brew shed exhaust fan

Possible Solutions:

  1. Get something with a higher CFM, and then build an insulated box around it to block out some of the noise.
  2. Redesign the duct work. What I accidentally created is a reflux chamber – doh! When the hot gas goes up through the fan, some of it cools and condenses on the walls of the ducting and then drips back down (all the way). My fault for designing it that way, but it was the shortest distance. What I probably need to do is orient the fan sideways and rig a dip tube that goes outside.

Other considerations when it comes to condensation in the brewery:

Selecting a hood is another issue. The loft makes for a built in hood, but it is not the same thing as a professional stainless steel hood. Those things are insanely expensive, coming in upwards of $1,000 for a cheap one. I had a left over dust collection vent from my wood shop so I mounted that. I don’t think the problem is the hood, I think the main problem is the reflux.

brew shed exhaust fan

https://www.rockler.com/product.cfm?page=11312
https://amzn.com/B0000223WV

Looking forward to anything our readers can share on this issue!  Don’t build a re-flux chamber like I did!


The Beer Tool – Cool Bottle Opener

Saturday, February 11th, 2012

When I saw this bottle opener I thought, dang, that is a cool idea!

wrench beer bottle opener

Quote from the product:
Like most great ideas, the Beer Tool came out of a problem. Being tired of having to use the wife’s bottle opener to crack a cold one the decision was made to come up with something tougher, stronger, and more manlier. A few hours later the original Beer tool was born and there was much rejoicing.

The Manliest Bottle Opener You’ll Ever Own

https://www.thebeertool.com/

There is something that just feels right about it. Works effectively and people get a kick out of it!

wrench beer bottle opener

They come in different sizes, so make sure to get the size you want. In this case I think bigger is better.
 

Disclaimer: TheBeerTool provided Brewer’s Friend with a complimentary opener.


Using a mini-fridge as a keezer FAIL

Saturday, January 7th, 2012

In an attempt to save money, space, and time, I thought it would be a good idea to buy a mini-fridge online for use as a keezer or fermentation chamber. Turned out there was not enough room.

mini fridge home brewing fail

mini fridge home brewing too small

All mini-fridges have a hump inside them where the compressor and fan are located. This eats up some of the usable internal space. The shelves on the door further constrain the internal space. The lesson: going online to buy a fridge/freezer for use as keezer is a bad idea. Sometimes the product description will list internal dimensions, but that’s not enough to go on since the floor might be sloped or the shelves might be in the wrong spot.


The best thing to do is make cardboard cut outs representing the foot print of what you want to put in the fridge. Also note the heights of the containers, leaving room for airlock, hoses, couplers, etc. For example, a corny keg needs 27″ of vertical space to leave clearance for the couplings and is 8-1/2″ – 9″ diameter. Take the cutouts with you to the store and bring a tape measure. Then you can be sure what you are buying will work out.

The humps inside mini-fridges and chest freezers are a real drag. In my keezer, the CO2 tank sits on the hump along with a moisture absorption tray. One trick is to build a 4” collar around the top of the keezer. The hatch will have to be removed and then re-installed when the collar is in place. Often this is enough to take the hump out of the equation so 1 or 2 more corny kegs can be placed inside.

Towards the middle of my project todo list is a fermentation chamber. This is done by removing the door from a mini-fridge and building an insulated box that extends the conditioned space. With a temperature controller, a mini-fridge in this setup can be used for precise temperature control during fermentation. What I’m not sure about is how to safely heat the chamber, in the event it gets too cold in the shed (let’s say I want to keep it at 65F, but outside it is 40F). More on that when I get there.


Curvy Brew Stand

Saturday, November 26th, 2011

Well I’m up and brewing in the shed these days. The brew stand is completed. The idea was to make a solid, aesthetically pleasing stand that will outlast me. I’m not sure if this qualifies as a brew statue, since it is wood not metal. Still the curves are sexy.

brew stand

“She’s got legs!… And she knows how to use them…”

brew statue wood

The stand is made of 2×4 doug fir. Everything is nailed and screwed together from multiple angles. I made the curved cuts with a jig saw. The shelves are 3/4” plywood, topped with backer board and tile. The tile is overkill for an electric brew setup, but makes for easy cleanup and a solid look. I painted the wood with a silicon based cement paint to really seal it good. The trim on the edges is 1/8” oak plywood. The thin plywood bends over the curves, and this helped hide all the defects in the original cut. The front is 1/2” walnut.

home brew stand

They say we are overdue for a big earthquake in the northwest. I really don’t want 180F water tumbling down on me or a guest. I see a lot of brew stands online that look rickety. If there is one thing to overbuild, its your brew stand! Aside from strong construction, I took extra care to make sure everything is strapped in place. The kettles are secured with cables. The brew stand itself is screwed into the studs with 6 inch lag blots on the top and bottom. The curves on the stand are setup so the kettles have to be lifted slightly to get them out for cleaning. The stand and the kettles are literally a part of the shed. The shed itself is bolted down to the foundation. Solid.

brew stand secure

Here are some more pictures of the brew shed. One reader had asked for a picture of the skylight. Here it is!

brew shed skylight

brew shed night shot


Want no ads? Go Premium and unlock all our brewing tools!