Brewing - Brewer's Friend - Part 5
Brew your best beer EVER. Save 10% on Brewer's Friend Premium today. Use code TAKE10. Sign Up ×

Archive for the ‘Brewing’ Category

Sparging Methods

Saturday, July 4th, 2009

There are several ways to extract the sugars that we convert during the mash from the grain bed, they include, fly sparging, batch sparging and NO sparging.

Fly Sparging: When the mash is complete the brewer will vorlaugh and begin the sparge. With this method the brewer wants to slowly and gently add water to the top of the mash, leaving 1-2” of water above the grain bed at all times to avoid grain bed compaction, while also slowly draining the MLT into the boil kettle at the same rate. Typically a flow rate of .5 – .75 quarts per minute will result in an effective and efficient fly sparge. For this reason it can take 40-60 minutes to complete a sparge for a 5 gallon brew session.

Pros of fly sparging include:

  • While one benefit of fly sparging in the past was increased lauter efficiency, this is debatable at best and with new split batch sparge techniques, most definitely not worth the extra time that it takes to perform. Thus the increased popularity in batch sparging.

Cons of fly sparging include:

  • The need to have an effective mashout, due to the fact that fly sparging can take up to an hour, the brewer will want to denature any enzymes in the mash.
  • Extended fly sparging can increase mash pH to a level where tannins will be extracted from the grain husks, which is not desirable
  • Channeling can become a problem if the manifold in the bottom of the MLT is not designed properly, which causes the sparge water to drive right through the grain bed, reducing efficiency and leaving sugars in the MLT.
  • You must match the Inflow of the sparge water very closely to the OUTflow of the wort from the bottom of the MLT during the entire sparge.
  • Possible lower quality wort during extended fly sparging due to rising pH and low sugar content of final runnings.

Batch Sparging: This is a method by which the sparge water is typically split into two equal batches. Proper and accurate calculation of the sparge water requirement is essential! When the mash is complete the brewer will vorlaugh and drain the MLT into the boil kettle, followed by refilling the MLT with the first half of the sparge water. The brewer will then thoroughly stir the mash, let rest for a few minutes, varlough again and drain into the boil kettle a second time. The last of the two sparge water infusions will follow this same pattern.

Pros of batch sparging include:

  • It can be completed more quickly than the slow and steady fly sparge.
  • Channeling is reduced since the MLT is being drained completely between sparges.
  • Temperature control is not as critical since each sparge water infusion is so large.
  • It eliminates the need to monitor the runoff speed, no need to match this with the inflow as you do during a fly sparge.

Cons of batch sparging include:

  • The grain must be resettled (vorlaughed) after each sparge water addition.
  • MLT size may need to be larger to accommodate the sparge water and grain volume while mixing and resting between sparges.
  • Efficiency “can” suffer, though with new split batch sparge techniques, brewers achieve 80+% efficiency, which is comparable to fly sparging techniques.

No Sparge, um, Sparging: This method is just as the name suggests… a method by which there is NO sparge. In order to accomplish this method, a brewer will mash in with ALL of the water that their brew will require., this could be upwards of 9-10 gallons of water alone for a 5 gallon brew session. When the mash is complete the brewer will vorlaugh and simply drain the entire MLT into the boil kettle, and if calculated correctly, meet their pre-boil volume.

Pros of ‘no sparge’ include:

  • It can be completed more quickly than either fly sparging or batch sparging.
  • Channeling is reduced since the MLT is being drained completely.
  • It eliminates the need to monitor the runoff speed, no need to match this with the inflow as you do during a fly sparge.
  • Extremely high quality wort due to no sparing resulting in low pH and high sugar content wort.

Cons of ‘no sparge’ include:

  • MLT size may need to be larger to accommodate the entire quantity of water needed to complete a brew session and the grain bill.
  • Efficiency will suffer, badly, due to the lack of an effective rinse of the grain bed.
  • Nearly impossible to accurately estimate the OG of a beer with this method.

Closing Thoughts: From the discussion above, it is clear to see why batch sparging, namely the split batch sparge, has become so popular with home brewers who value their efficiency and their time.  Don’t expect to hit 80% on the first try.  Water chemistry and temperature control are big parts of success in this area, so make sure to check out the calculators at this site to prepare you.


Brew In A Bag (BIAB) All Grain Brewing Method

Saturday, June 20th, 2009

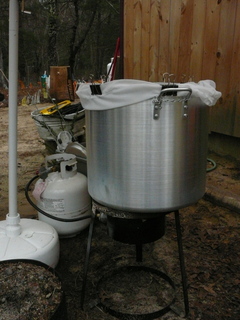
BIAB is an acronym for Brew In A Bag. It is a dead simple all grain brewing technique. All it requires is a large grain straining bag, 15 gallon kettle and a propane burner. This method is excellent for brewers who are wishing to convert from extract brewing to all grain, because you can make that leap for a very minimal cost. It will also save an all grain brewer 1.5-2.5 hours on a typical brew day. If you combine this method with the No Chill brewing method also listed on this site, you can go from extract to all grain brewing for as little as $25!

BIAB utilizes THREE pieces of equipment:

The kettle: This kettle is the ONLY vessel required to BIAB. The only special requirement is that the kettle have a volume of at least 15 gallons for a 5 gallon brew session. This is because this one vessel will have to hold your entire water requirement as well as your grain bill. This volume will regularly exceed 10 gallons. You will mash and boil in this vessel.

The bag: This is a mesh bag that is large enough to conform to the inside diameter of the kettle and reach over the top lip. This bag is sometimes likened to a large pillow case, the kettle should be able to fit INSIDE it while still being able to close the top of the bag. Typically composed of “voil” or another mesh like material, this will hold your grain bill and must be strong enough to hold the water saturated grain when you lift it out of the mash water at the end of the mash.

The heat source: This is typically the very popular “turkey fryer” burner that is used widely by home brewers. This will be utilized to provide heat for strike water, maintaining mash temperature, mash-out and the boil.

brew in a bag
Fig 1.

The process:
Crush your grain finer than you would with a typical all grain brew. This is because you no longer have to worry about a stuck sparge. The bag is the filter and the finer crush will improve your conversion efficiency.

Fill the kettle with the TOTAL water required to complete the entire brew session. Take into consideration that the water absorbed by the grain with this method is about HALF that of a typical all grain brew session that utilizes a MLT. Remember, when you remove the grain bag after the boil, the wort that is left is exactly what you are boiling, so calculate this carefully. Insert and secure the bag at this time.

brew in a bag
Fig 2.

After heating the water in the kettle to your calculated strike temperature, pour your entire grain bill into the secured bag. Use a mash paddle to thoroughly mix the grain with the water so that there are no dough balls. There will be a very large volume in the kettle, so temperature control should be as easy as intermediate stirring and a couple quick firings of the burner if the temperature drops.

brew in a bag
Fig 3.

After the mash is complete you heat the mash to mash-out temperature, which is crucial to achieving good efficiency with BIAB since you are NOT rinsing the grains.

After mash-out, remove the grain bag and allow it to drain into the kettle. Some brewers will place a rope and a hook above the kettle to suspend the grain bag as it can become heavy with larger grain bills.

brew in a bag
Fig 4.

brew in a bag
Fig 5.

Finally, boil the wort just as you normally would.

brew in a bag
Fig 6.

Additional References:
https://www.homebrewtalk.com/f36/more-brew-bag-biab-success-88486/
https://www.aussiehomebrewer.com/forum/index.php?showtopic=11694

Here are a few important points to make about BIAB:

**DO have a large enough kettle to accommodate about 9 gallons of water AND your grain bill.

**DO have a bag large enough that you can fit the kettle INSIDE it and still close the top.

**DO crush your grain fine, it will produce better conversion efficiency and there is no danger of a stuck sparge.

**DO NOT skimp on mash time, this is more crucial with BIAB, mash for 60-70 minutes to achieve full conversion.

**DO NOT allow your grain bag to come into contact with the bottom of the kettle when you are applying heat, it may melt! Some place a wire cake cooling rack in the kettle to lift the bag off the bottom.

Photos courtesy of user “Daddymen” on homebrewtalk.com. Thank you!


Australian NO CHILL Brewing Technique TESTED

Saturday, June 6th, 2009

“No Chill” is a term used for the Aussie method of transferring HOT wort into a sealed container and letting it cool gradually, over a period of time. Aussie brewers generally pitch the yeast when they see fit to do so, sometimes days or even weeks later. This method has evolved out of the necessity to conserve water in some areas of the world, such is the case in Australia.

By utilizing this method I hoped to:

  1. Conserve the many (50) gallons of water that I waste while operating my immersion chiller.
  2. Conserve time (20-30 minutes) that is spent cooling the wort on brew day.
  3. Conserve time by fermenting in the same HDPE (High-density polyethylene) vessel that I transfer the hot wort into after the boil.
  4. Reduce the amount of equipment required (no chiller) to complete an all-grain brewing session. This may be of special interest to new all-grain brewers.

The “PLAN”: Brew a recipe that I have brewed many times before, something low ABV and lightly hopped so that any real flaws in the flavor will be very apparent. I brewed the beer normally except for a small change to my late hop additions. The planned OG is 1.040, FG 1.011 and comes in at a light 18 IBUs.

There is still a noticeable amount of hop utilization happening in the wort as it cools in the HDPE container; at temperatures above 170F this is more pronounced and will affect the total IBUs of the beer. For this reason I have adjusted my late hop additions to keep them from bittering the beer.

The CONTAINER: A 6 gallon HDPE container from www.USPlastics.com ($15) and a #11.5 drilled stopper ($2.25) to accommodate the large opening where the cap currently exists. Aside from this, the HDPE container is simply outfitted with a stick on thermometer to indicate when the temperature is appropriate to pitch the yeast.

The PROCESS: After the boil I added what remained of my late addition hops to the HDPE container, those that were not moved to FWH. I gently whirl pooled the wort in the boil kettle and let it stand for 10 minutes to allow some of the material in the wort to settle to the bottom of the kettle.

The kettle was drained into the sanitized HDPE fermentor, once filled, the cap went back on tightly and I gently turned the vessel on its side to allow the hot wort to further sterilize the inside of the container. I then placed the container in my 65F fermentation freezer for a 24 hour period to chill.

aussie no chill brewing

When I drained the kettle I saved about 1 quart of the wort to create a 24-hour yeast starter. This is referred to as a RWS, or Real Wort Starter. NO MORE DME!

aussie no chill brewing

After 24 hours: The wort had cooled to yeast pitching temperatures, so the fermentor received a good shake to adequately aerate the wort. Once this was complete, the yeast starter went in and the cap came off so that I could affix the stopper/air lock in its place. Signs of a healthy fermentation were visible in the air lock within 5 ½ hours of pitching the starter.

14 days later: The fermentation is complete, the hydrometer is showing the target FG of 1.007. Very light, very crisp! The beer is transferred to an awaiting keg for a couple weeks of cold storage and carbonating. The cold and flat beer has a distinct “twang” to it… much like any green beer, time will tell if this brew will have any off flavors from the “no chill” method.

28 days later: After much anticipation it is time to pull the tap! This beer is still young, it has not completely cleared, though it is clearer than it was when first kegged. The aroma is slightly malty, slightly hoppy (Cascades) but very mellow, just as this Haus Ale has been in the past (4) keggings while using an immersion chiller. The flavor… it is again identical to previous batches that were chilled in the conventional manner. It is very light, slightly citrus (Cascades) and very easy drinking. There are no indications of DMS (a corn like flavor) and the hop profile is identical to previous batches that were chilled conventionally.

Following are the guidelines I followed to reduce the perceived bitterness of hop additions.

  1. Assumed that the HOT wort in the HDPE container would add 20 minutes of utilization to ALL hop additions.
  2. Moved my (20) minute hop addition to the HDPE container (20 minutes utilization in the container from #1).
  3. Moved any hops that required LESS than (20) minutes boil time to FWH (this provides a complexity in flavor and bittering and less perceived bitterness).


Over Priming Home Brew Bottle Bomb

Monday, June 1st, 2009

If you happen to over prime your bottled home brew beer, this is what you will get:

home brew bottle bomb

“Huston We Have A Problem”

This beer was very excited to see me!  It had a texture more like soda at least until it settled down.

Over priming creates a veritable fountain of fizz, and if left unattended can shoot off on its own.

A tell tale sign of over priming when the cap begins to buckle. The bubble in the middle should be a dimple.  If you see a cap in this state, make sure to open it over the sink! Some folks call this a bottle bomb, but I have never had one explode. More than likely the cap will shoot off and you will have a sticky mess wherever the beer was stored. One way to contain the situation is to use a bottle opener to gently relieve the pressure without prying off the cap.

beer over priming

The solution to this problem is to add the correct amount of sugar at bottling time. Make sure to measure out how much dextrose (corn sugar) you are using. I use about 3oz by weight for a five gallon batch. Don’t get aggressive with this ingredient, less is more. You can also prime with dry malt extract (DME), however it is more expensive, requires more, and I have not been able to tell the difference.

The hard core home brewers will tell you to solve this problem, keg the beer instead of bottle it. I consider myself a hardcore brewer, and I do keg a lot of my beer. That said, I still enjoy bottling as the flexibility and portability are big advantages, though it does take more time. The photos above were from an experimental one gallon batch of mint porter, which didn’t turn out that great. I manually primed each bottle and a few bottles got too much dextrose.


Basics of Hops in Brewing

Saturday, May 23rd, 2009

Hops contribute four elements to beer: stabilization, bitterness, flavor, and aroma. Using the right hops, added to the boiling wort (pronounced wert) at the right time, is every bit as crucial as using the right grains or yeast.

Hops resins contain two types of acid, one (Beta) that contributes to aroma, and the other (Alpha) that contribute to the bitterness of a beer. Commercial hops are air dried prior to packaging. The resins require boiling to fully release the acids. The higher the percentage of Alpha acids in your hops, the more bitterness will be imparted, leading to a higher IBU value for the beer. Usual time for boiling is 60 minutes.

Hops also contain essential oils that contribute to aroma and flavor. These oils are aromatic (like the oils in coffee), which means they will evaporate out of boiling wort over time. Hops added for aroma are added last in the boil, and usually boiled for five minutes or less because “hop flavor” tends to boil out within 15 minutes. Over-boiling these hops defeats the purpose of adding them. Over-boiling bittering hops has no effect, since the bittering acid isn’t aromatic and won’t evaporate out in a boil. The cutoff point between a bittering hop and an aromatic hop is somewhere around an alpha acid level of 8%, but some higher AA variates are dual purpose.

Some styles of beer call for even more hop flavor and aroma, such as India Pale Ales. In order to increase the ‘hopiness’ of a beer further, hops can be added after the wort is chilled and left to ferment with the wort through the primary fermentation. This process is called “dry hopping”; the un-boiled hops soak in the fermenting beer for weeks.

If you have to substitute because your preferred variety of hops are not available, bittering hops are the easiest to substitute, since you’re comparing the IBU and Alpha Acids By Weight. (often noted as “Alpha %”) Flavor & aroma hops are trickier to substitute; the best strategy is to pick a hop from the same family (American, English, German, Saaz, etc). Changing the hop used in dry-hopping has an even larger impact on the finished beer, so even more care should be used.

The next choice a home-brewer must make is picking between hop pellets and dried hops. If you live in the right part of the world, you can even use fresh hops in your beer; as you might expect, the fresher the hop, the more aroma and flavor it provides. Dried hops are preferred, but may not be available. Hop pellets are hops that have been dried and compressed; they have the advantage of being small and easy to add down the neck of a carboy, but aren’t as good for aroma and flavor hops.

Hops can be added directly to the boil as loose leaf or placed inside a ‘hop sock’ for easier cleaning afterward. Use the same rules as making tea: wait for the wort to reach a roiling boil before adding the hops. If you do use a hop sock, consider adding an additional few minutes to the boiling time, especially for your bittering hops, as the hops won’t be able to circulate as well inside the sock.

At the end of the boil, strain the boiled hops out prior to fermentation. You can sparge the hops by gently pouring water over the boiled hops, and applying gentle pressure with a spoon or other tool. While it’s a good idea to sparge flavor & aroma hops, if your beer only has bittering hops, you can safely skip this step.

This site maintains a hops alpha acid table.


First Wort Hopping

Saturday, May 9th, 2009

Brewers are always interested in improving the flavor and aroma of their beer, and there seems to be an endless array of techniques by which to accomplish this. One technique that is receiving much attention is first wort hopping. Also known as, and referred to as, FWH in most brewing circles and software applications.

First wort hopping is the method by which a hop addition is added to the boil kettle prior to lautering your grain bed. This allows the hop oils to steep in the 150F-160F wort during the lauter and then be boiled for the entire duration of the boil. There are complex reactions occurring in the hop oils during this low temperature steeping that are not well understood, but the effect is unmistakable. FIG 1.

first wort hopping
Fig 1

This process is well suited for beers where you would like to accentuate the hop aroma and flavor of your beer, for obvious reasons this is probably not a great match for a malty Marzen or malty Holiday Ale.. FWH’ing provides the beer with a much more refined bitterness and flavor, it is sometimes referred to as a “round” flavor, less sharp.

Though the hop utilization is generally about 10% greater than a typical hop addition added at the beginning of the boil, the bittering perception is many times said to resemble that of a 20 minute hop addition. For this reason, FWH’ing generally does NOT take the place of your bittering hop additions. There are a few simple FWH’ing rules, but these are by no means limits to FHW’ing, just general guidelines.

Simple First Wort Hopping Guidelines:

  1. Do not alter your bittering additions, whether they be 60, or 90 minutes. The increased utilization is offset by the more refined bitterness and flavor of the addition.
  2. Use noble or low AA hops with a low cholumene level for FWH’ing. Some claim that high AA bittering hops utilized in this manner create a less pleasing flavor and bitterness than do low AA or noble hops.
  3. Use the recipes late addition hops (0-20 minute additions). The flavor and aroma from the FWH addition is a suitable substitute for these additions.
  4. Use approximately 30% of the total hop bill, for FWH. This 30% will constitute the 0-20 minute hop additions from the original recipe.

The afore mentioned “rules” are a general guideline for FWH’ing, but they are by no means the limits of this method. I have brewed an APA that uses ONLY a FWH addition for bitterness and it is one of my favorite beers, so you can feel free to experiment. Until you feel comfortable with the FWHing technique, try the afore mentioned “rules” and then branch out once you get a feel for what it contributes to different beer styles.

Partial mash and extract brewers can also experiment with FWH’ing in their beers!. The key here is to realize that the FWH is dependent on the hops steeping for a time in 150F-160F wort. In the case of a FWH’ed partial mash the hops could be added to the wort immediately after the grains are removed. Steep the hops for 20-30 minutes prior to the boil to mimic the time interval that would take place during an all grain lauter. After this steep, then boil as usual and make your usual hop additions.

To use this method in 100% extract brewing you will have to heat the water + extract wort to 150F-160F and allow the hops to steep in this warm wort for nearly 20-30 minutes, this will closely mirror that of FWH’ing in an all grain brew. After this steep, then boil as usual and make your usual hop additions.


Cold Crashing Ales A Way to Clarify Beer

Saturday, April 18th, 2009

Many homebrewers are interested in achieving that sparkling clarity that they see in mass produced beers. A clear beer doesn’t taste any different, and if it is free, your friends won’t be complaining if it is a little hazy! Clearing your creation will further highlight the care and effort that you put into producing it.

Clearing beer with cold temperatures is easy and effective, if you are patient. Ferment your beer as you always do, being sure that you have reached FG and that the beer is ready to be bottled or kegged. Place the fermentor in your lagering/fermenting refrigerator for a minimum of one week at nearly 38F. Given more time, more of the haze producing proteins will coagulate and settle out.

During this time at cold temperatures, proteins and yeast will be settling out of the beer, as they do when you place your bottles of hazy beer in cold storage for long periods. Temperature and time are your friends when you are cold crashing beer. After a minimum of one week at about 38F you can rack your beer off the settled yeast and trub and either bottle or keg it.

If you are bottling your beer, prime the beer normally but be sure to place the bottles in a 70F climate to ensure that the yeast has an optimum temperature at which to carbonate your beer.

If you are kegging your beer, simply transfer the clear beer to an awaiting keg. Since the beer is at or near your serving temperature this is a great time to apply pressure and begin to carbonate. CO2 does not dissolve well into warm beer, but at nearly 38F you will be able to properly carbonate your keg in as little as 24 hours.


Brewing Process Improvement Ideas

Sunday, March 29th, 2009

Consistency is the Virtue of Homebrewing
Part 3: Process improvements

To brew a consistent beer from one batch to the next, it helps to have clean, sanitary equipment each and every time. This is discussed in depth in Part 1 of this series. If you’ve just stumbled upon this article, I recommend starting from the beginning. It also helps to have a detailed recipe, and a good set of process notes to act as a ‘road map’ of how previous batches developed. This was covered in Part 2. However the best notes and the cleanest equipment can still be undone if your brewing processes leave the door open for uncontrolled changes from batch to batch.

The key points for consistency in your brewing process are are:

  • Crush grains consistently
  • Mash consistently
  • Water chemistry balance
  • Sparge consistently
  • Cool the wort quickly
  • Use the same type of fermentor and control the temperature
  • Transfer the beer between vessels gracefully – gravity and spigots are your friends!

The good news is, these process improvements in home brewing can be made incrementally and on a budget.

The Crush:

A frequent source of variation is the crushing of the grain; while it’s certainly possible to crush your own grain with household items, do-it-yourself techniques inherently lend themselves to variations. Most homebrewing stores that sell grain have a mill and will provide that service free of charge with the purchase. Be careful though, your local home brew store (LHBS) mill might have the gap set a little too wide. This site has an article on how to best crush your grains.

The Mash:

Most people start out doing extract batches with a kettle such as this:
basic 20 quart brew kettle

As you progress towards partial mash brewing or all grain brewing this becomes a limitation. The uninsulated metal pot has problems keeping the mash at a constant temperature. It requires a lot of attention to mash with (eg: stir, remove it from heat, stir again, then re-heat, etc). Over the course of the 60-minute mash time it is a lot of work to keep the mash in the 145F-158F degree temperature range. While this gives a good mix of alpha and beta type starch conversion for any given beer, it doesn’t give very consistent results from batch to batch. Switching to an insulated mash tun (converted from a cooler with a kit found at most homebrew stores) not only removes the stirring and temperature adjustment, it also means every batch of beer mashes the same every time. As we mentioned in the record keeping article, noting the temperature of the mash, and monitoring it closely is key.

cooler mash tun

Water Chemistry:

Water chemistry in mashing is also a concern and there are a lot of details involved. Generally adding a teaspoons or less of the correct brewing salts can help bring flavor ions into balance and the cost is negligible. This site has a water chemistry calculator and a write up that details water chemistry in brewing.

Sparging:

All-grain brewers also needed to sparge or lauder grain, another process that improves with practice. At its most basic, the process of sparging is pouring water over mashed grain to wash the remaining sugars and non-fermentables into the wort. Originally this is accomplished by simply pouring water over the grains, called batch sparging. Again here, noting time it soaks, the amount of water, and the temperature is crucial to success. To get even more consistent there is fly sparging, or the use of a RIMS/HERMS system.

Cooling:

After boiling the wort, it needs to be chilled to below 80F (26C) before the yeast can be added. The easiest method for chilling is simply to allow it to cool; unfortunately, this method is not only slow, but means that the wort is exposed to air (and thus wild yeasts, molds, and bacteria) for a longer interval. A wort chiller (below) speeds up the process considerably, reducing exposure and resulting in a more consistent brew week to week.

wort chiller

wort chiller in action

Fermentation:

Most homebrewers start out with a plastic pail with a simple lid, and this works very well for the first few batches and some swear by this approach. Upgrading to a glass or plastic carboy is more expensive, but with the addition of a simple airlock, you’ve just refined your process again. Glass vs. plastic fermentation has been debated in the brewing forums in the past. This site has an article explaining the pro’s and con’s.

The temperature of the fermentation is also key.  Yeast produce different flavor profiles at different temperatures, generally the higher the temp the more interesting the flavors will be. This can be a plus or a minus depending on the style but it is another variable to worry about in consistency.   Some home brewers have built their own insulated chamber to control for this.   Paying attention to what time of year a brew was done is a good way to start correlating temperature of fermentation with your results.  There used to be a rule in Germany that forbid brewing after summer started because they knew the beer would be ruined by the heat – of course back then they did not have climate control.

Transferring:

When transferring the wort to the fermentor it needs to be aerated but after that it should not be exposed to oxygen. If it does get exposed to oxygen it will develop off flavors in the bottle over time.

When possible, setup your equipment so it can be drained by gravity. For example, if your kettle has a ball valve on it, then you can drain the kettle into the fermentor quite easily through a sanitized hose. If your fermentor happens to be a bucket, you can fit it with a spigot (before hand) and similarly rack to the secondary or bottling bucket by opening the valve and draining through a tube. Bottling buckets with spigots are extremely handy. As for racking out of a glass carboy, an auto siphon is an easy way to go. If you have to manually raise the container up to the table, make sure to give it a few hours to settle first.

Conclusion:

All of these improvements can be done separately. Each improves one step of the brewing process, removing uncontrolled variables and ensuring that the only changes from batch to batch are the ones you, the brewer, intended. There’s nothing wrong with the basic starting kit, but as you progress in the hobby, you’ll find each of these improvements results in a better beer overall.

Achieving consistency can be a long road. It involves developing good cleaning habits, practicing strong record-keeping discipline, and gradually improving your processes. The reward for being able to brew beer that tastes the same from batch to batch isn’t just a consistently drinkable beer. It also means that the results of experimentation can be clearly identified, meaning each new batch means more knowledge for you, the homebrewer.


Best Grind Setting for Grains

Saturday, March 28th, 2009

It pays to listen to your grist, it can tell you a lot about your brew day before you ever mash in, if you look and listen to what it is telling you. Do not underestimate the importance of a good crush and the pitfalls of a bad crush on brew day. Your brewing efficiency can be negatively impacted if the grain is milled too coarsely, making your beer weaker. However, if you grind too fine you risk a stuck sparge – which really sucks!  This article will tell you how to best mill your grain and provide photo examples.

(Fig. 1) The GOOD crush: A good crush is one that produces little flour, but fully separates the inner meal of the kernel from the husk. In doing so, the husk must be left mostly intact. The benefits of this crush are little flour which can cause a sticky stuck sparge, excellent mash conversion due to the fully exposed inner kernel, no astringency from shredded husks and a good filter bed from leaving the husks intact. Gap set to 0.035″.

perfect brewing grain crush
Fig. 1

(Fig. 2) The BAD crush (too coarse): A coarse crush can be found relatively easily when buying pre- milled malts from many suppliers. Many homebrew stores crush their grains more coarsely to provide less of a chance of a stuck sparge, but this will also cause you low mash efficiency resulting in the need to use more grain to achieve the target OG of your brew. This crush is defined by no flour, cracked but not separated inner meal of the kernel, and yes, some whole kernels left in the grist. You will see poor mash efficiency, no astringency from shredded husks and a great filter bed since you are dealing with such large kernel/husk portions. Gap set to 0.065″.

bad brewing grain crush - too coarse
Fig. 2

(Fig. 3) The BAD crush (too fine): When a poor crush is defined as too fine, it is generally caused by someone being a little over zealous in achieving high mash efficiency. A good goal, but you can go too far. This crush is defined by a lot of flour, shredded husks and nearly pulverized meal from the kernel. The results will be excellent mash efficiency (if you can actually drain the MLT), a poor filter bed from the shredded husks, some astringency from the shredded husks and an almost certain stuck sparge from the flour. For the record, labs will do a fine grind when analyzing grain extract potential but home brewers should avoid such a fine grind. Gap set at 0.025″.

bad brewing grain crush - too fine
Fig. 3

Use the crush setting specified by figure 1 above and you will have a better brew day!


Mashing, Thick or Thin?

Sunday, March 22nd, 2009

One variable that all-grain brewers may not consider is mash thickness and how it affects efficiency and wort quality. It turns out adjusting the water to grain ratio in the mash might help. Increasing efficiency in all-grain brewing reduces the amount of grain required to reach your target OG, thus reducing the cost of your new, or old hobby. Thin mashing can be one method of improving efficiency as well as wort quality.

If you utilize a 2.0qt/lb mash, as opposed to 1.25qt/lb, you are creating more of a “soup” in your MLT. Breaking up dough balls and mixing the mash is much easier and enzymes are also more effective at converting starches to sugars in this environment. A thinner mash results in better conversion efficiency, conversion efficiency being the % of total starches in the MLT being converted to sugars.

In this case we increased the mash water from 1.25qt/lb to 2.0t/lb. In doing so we reduced our sparge water volume, this is the water that we use to rinse the sugars from the grain in the MLT during the sparge and lauter. If your mash consists of 12lbs of grain and you increased your mash water volume by 2.25 gallons as in the above scenario, you are reducing your sparge volume by that same amount. This can reduce your lauter efficiency, robbing you of some efficiency as well.

Although the reduced sparge volume can rob you of a small amount of efficiency in the end, it also rewards you with a higher quality wort. Fist runnings when sparging are the best… the sugar content is high, the pH is low and you are not extracting tannins from the grain husks as you are with a long and high volume sparge.

Thin mashing is not for everyone. If you are already achieving 80% or better efficiency into your fermentor with a thicker mash, you will likely see no increase by utilizing a thin mash. In this case your conversion efficiency is already nearly 100%. Essentially, all that you are creating by thin mashing is a scenario by which you are reducing your sparge volume, thus reducing your lauter efficiency while seeing no increase in your conversion efficiency. You will have a net loss.

If you are currently achieving 80% efficiency or less, you may want to experiment with a thin mash. You could easily increase your efficiency 5-15% by simply mashing thin! You will also see a benefit from increasing the quality of your wort by reducing the amount of sparging. Excessive sparging increases pH and extracts tannins from the grain husks, both undesirable.

Try it! Deviate from the typical 1.25qt/lb mash and try 1.5qt/lb or even 2.0qt/lb! This author has realized an increase from 70% to 85% efficiency by implementing this method alone.


Want no ads? Go Premium and unlock all our brewing tools!