Home Brew Blog - Brewer's Friend - Part 9
Brew your best beer EVER. Save 10% on Brewer's Friend Premium today. Use code TAKE10. Sign Up ×

Book Review – Booze For Free

Friday, June 7th, 2013

Booze for Free – The Definitive Guide to Making Beer, Wine, Cocktail Bases, Ciders, and Other Drinks at Home – by Andy Hamilton.

Booze for Free Book Review

https://www.amazon.com/Booze-Free-Definitive-Making-Cocktail/dp/0452298806/ref=pd_sim_sbs_b_1

This book is a fun, quick read with some witty comments by the author.  The book is mostly focused on ingredients that can be foraged, like wild herbs, berries, fruits. It includes more exotic, historical, and what are now considered peculiar ingredients like tree sap, dandelion, nettles, etc. Touches on beer a little, but there are much better books out there that focus strictly on beer.  The free part is a bit of a misnomer, unless you want to forage for berries and do a wild fermentation. I’d like to re-iterate to readers, when it comes to brewing anything – you get what you pay for in terms of ingredients! Garbage in garbage out is the saying in the computer world, and the same is true in the brewing world. My advice is to start with the highest quality freshest ingredients you can afford!

If you are interested in brewing with any of the following ingredients, I’d check the book out. There over 100 recipes using the following:

  • Acorns
  • Apples
  • Bay
  • Beech Leaf
  • Beets
  • Birch sap
  • Blackberry
  • Blackcurrants
  • Broad Bean (fava beans)
  • Broom Flower
  • Carrots
  • Cherries
  • Cleavers
  • Courgette
  • Damson
  • Danelion
  • Elderflower
  • Grapes white/red
  • Golden lime sap
  • Gorse
  • Hazelnut
  • Himalayn balsam
  • Hops
  • Horseradish (vodka – whew!)
  • Japanese Knotweed
  • Japanese Rose Petals
  • Lavender
  • Mint
  • Mugwort
  • Mulberry
  • Nettles
  • Pears
  • Pine needles
  • Plumbs
  • Pumpkin
  • Quince
  • Ratafia
  • Rhubarb
  • Rosebay
  • Rosehip
  • Rosemary
  • Rumtopf
  • Sloe
  • Sumac
  • Sweet corn
  • Walnuts
  • Yarrow

    and finally:

  • Prison Booze – complete recipe!


I personally wish I could try small samples of some of the recipes and see if it is worth attempting a brew. I’m pretty skeptical of dandelions in beer…  However, my lawn is full of them!  I’d have a year round supply (if it was to my taste that is).

Disclaimer: Brewer’s Friend was sent a free copy of the book to review.

Post by Larry

2013 May Release Updates

Tuesday, May 28th, 2013

May has been a busy month for Brewer’s Friend. The mash calculator tab has new updates. Recipes integrate with the Mash Chemistry and Brewing Water Calculator.  The 1.3 version of our iPhone app is live and supports sync of brew sessions and brew logs!

We are very happy to get these items knocked out for you! Our mission is to help you brew better beer!

Mash Calculator Section of Brew Feature Tuned Up:
  • Strike Tab now allows targeting mash thickness or infusion volume.
    strike by thickness or volume

  • Ability to mash in quarts or gallons (for users who have their units set to US).  The input fields on related tabs work in gallons as well.  Mash water unit is profile option. The default is quarts, but it can be changed under your brewing profile.  The mash water unit value can also be overridden on the Brew Start page. Related to this, the Water Volume Tracking table shows key volumes in quarts and gallons (when brew is in US units mode).

    mash in gallons or quarts

  • Added Fly Sparge and Batch Sparge options, which make things much clearer.

  • Warnings related to exceeding volumes, boiling, or freezing are now textual instead of popup alert dialogs.

Advanced Water Calculator Integrated with Recipe Editor:

A few months ago, in collaboration with Kaiser, we launched our Mash Chemistry and Brewing Water Calculator, which does mash pH estimates in addition to many other water chemistry calculations.  In this release, the advanced water calculator and the recipe editor are more tightly integrated. Look for the link to the Mash Chemistry and Brewing Water Calculator on the Recipe View or Recipe Edit pages. (Requires a water profile to be selected.)

Recipes Integrated with Advanced Water Calculator

I’m hooked on this tool because it shows the relationship between grain bill, brewing salts, and mash pH. Following the link from the recipe leads to a pre-populated version of the tool (target profile, grain bill, and water volumes are filled out based on the recipe and your profile). You can also load in your source water profiles from the drop downs without having to re-type them.

Mash Chemistry and Brewing Water Calculator

Multiple Water Profiles Supported:

As a follow on to the above item, accounts now supports multiple water profiles, not just one!


iPhone 1.3 Launched

Brew Session and Brew Log Sync Supported!

Brewer's Friend iPhone App 1.3 screen shot brew session sync


Other items:
  • Ability to delete all items from shopping list.

  • On the recipe edit and view pages, the number of yeast cells needed to hit the targeted pitch rate is displayed.

  • Added brew log entry type ‘yeast starter’.  I typically create my brew session the day I make my starter.  The volume drop down now supports Liters as well (for some reason I always do starters in Liters).


Happy brewing,
Larry

BRY-97 American West Coast Yeast Review

Friday, May 24th, 2013

BRY-97 is a relatively new dry yeast on the market released in limited amounts in 2012.  Got a pack for the first time late last year. That brew is almost completely gone, and I’m happy with the results, but there were a few surprises!

In a nutshell, BRY-97 is NOT your typical Chico strain like US-04, Wyeast 1056 or White Labs WLP001.  

BRR-97 yeast american west coast

BRY-97 accentuates malt character and provides some fruity notes (pineapple, citrus). It also has a huge frothy krausen head and a long lag time compared to US-05.

I brewed an IIPA with it, fermented at 65F (not too cool, not too warm).  The beer was great, but I was surprised that it wasn’t a more neutral strain, like the Chico strains.  The shed smelled like pineapple the entire time it was fermenting!  The tropical note has dropped off now after several months in the bottle but there is still something sweet and fruity about it.

Since I only had one pack, I did a starter – check out the krausen head:
BRR-97 krausen head

Normally with dry yeast I would buy more packs instead of making a starter. I could only get one pack on special order with BRY-97, so I did a 1.5L starter. Due to the lag with this yeast (which I was not aware of at the time), it took 2-3 days longer than normal to finish out, and I had juggle my brew schedule.

Flocculation was great, the beer was clear after 2 weeks. No off flavors or any issues with esters or weirdness. The beer was quite drinkable after 30 days, so I take it this yeast doesn’t stay green as long. I’d use BRY-97 again for something along the lines of a Kolsch or summer beer, but not in a brew where I want the hops to shine.

This Home Brew Talk thread has pages and pages of interesting comments. There is a lot of concern about the lag time, extra price, and muted hops:

https://www.homebrewtalk.com/f163/anyone-try-bry-97-yet-333553/


Danstar’s product page is here:

https://www.danstaryeast.com/products/bry-97-american-west-coast-yeast


Post by Larry

Pre-Prohibition Beer Bottle Lamps – Art, History and it Lights Up!

Friday, May 17th, 2013

If you are looking for a cool item to give to the brewer who has everything, check out Peared Creation. They make lamps out of pre-prohibition beer bottles. We were sent one of these lamps to review! The cord is an antique fabric style. The on/off switch is a vintage faucet handle. It gives a nice warm amber light. The lamps use standard 15 watt bulbs and each lamp comes with a spare bulb. Each lamp includes a tag that contains more information about the particular brewery the bottle came from. While the lamps are not cheap, starting at $125, they are unique and offer an authentic and intangible historical component you can’t get at Walmart or Target.

Peared Creation has several designs to choose from:

home brew lamp

lamp with beer bottle

pre prohibition beer bottle lamp

pre prohibition bottle

Peared Creation also has a wide range of pre-prohibition bottles which can be purchased separately from their lamps.  In looking through the selection, they sure don’t make beer bottles like the used to. I like how the brand names are embossed in the glass. It is also interesting to note that there was a larger percentage of clear bottles back then.

I can’t imagine how frustrating the prohibition must have been for brewers! I don’t recognize any of the names of the bottles, probably because they all went out of business. 

I asked Jay at Peared Creation about the possibility of re-packaging home brew into pre-prohibition bottles. His reply: “I wouldn’t trust the bottles to drink out of. Many of them have been in the ground for 100+ years and minerals have been leached in and out of the glass.” 

That’s a bummer, would look cool, but better to err on the side of caution. I’ll keep using the pre-prohibition bottle for a lamp, and stick my my recycled bottles for beer.

By the way, I am trying to talk my wife into letting me keep the lamp in the house.  For right now it is in the shed – works for me.

brew shed lamp

home brewing lamp

Post by Larry


Hops Squeezing and Hops Absorption – More Bitterness Please

Friday, May 10th, 2013

Should we squeeze out the hops bag or not?

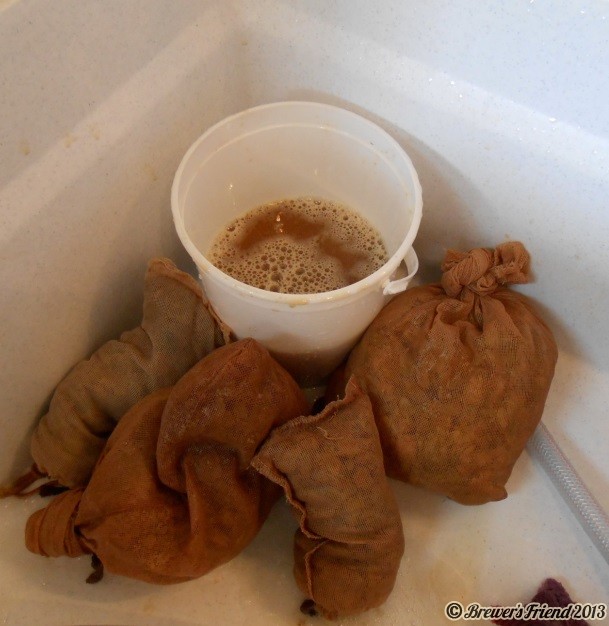
A recent IPA brew session called for 7 ounces of hops. The recipe is 110 IBU with a lot of late hopping.  For this brew, I did not squeeze out the hops bags and left them behind after draining the kettle. I then squeezed out the hops bags into a small bucket, and here is what I got:

hops absorption squeeze or not to squeeze hops bags


The resulting beer wasn’t as bitter as I would have liked, maybe more like 80 IBUs, and I think the lack of squeezing is the reason.   I tasted what I collected, and holy moly was that bitter! It was like an IPA espresso!

There are claims floating around online that say avoid squeezing or else harshness will be extracted. That applies to the steeping grain bag, but NOT for the hops bags.  When it comes to hops – squeeze away!

On lighter beers with only an ounce or two I skip the squeezing step, but for IPAs I will be squeezing from now on.  A dedicated set of BBQ tongs work the best.  Sanitize them first along with the kettle lid and primary fermentor.  Don’t use dirty bare hands to squeeze, as this could infect the batch. Not to mention, wait for the wort to cool down if using an immersion chiller. If using a counter flow chiller or plate chiller, be extra careful about squeezing the hops, which will be boiling hot.

How the Brewer’s Friend recipe editor and brew feature handle hops absorption:

  • The hops absorption amount shows up in the water requirements report (recipe tools -> water requirements). The result is based on the amount of hops in the recipe, and your hops absorption equipment profile setting. The system correctly excludes dry hops and mash hops from the hops absorption calculation.
  • My profile was set to the default hops absorption rate of 0.15 quarts per ounce. At 7 ounces of hops, that comes to a little over 1 quart. In measuring what I got in the bucket, it is spot on. The default of 0.15 qt/oz was accurate in this case.
  • Hops absorption negatively impacts brew house efficiency. This comes into play if your batch size target is set to ‘fermentor’ (which means brew house efficiency is the efficiency factor the recipe is working with). If your batch size target is set to ‘kettle’, then you are targeting ending kettle efficiency, and hops absorption doesn’t count against that.  Read more about efficiency here.
  • For purposes of designing a recipe ‘to the fermentor’ that uses a lot of hops, if you are not squeezing out the bags, adjust efficiency down 1-2% to compensate for hops absorption.


Want to know everything about IPAs? Check out this book by Mitch Steele

Friday, May 3rd, 2013

IPA Brewing Techniques, Recipes, and the Evolution of the India Pale Ale by Mitch Steele.

A great book covering every detail you ever wanted to know about IPA brewing. It starts from the early history of beer all the way through to today’s modern hop bombs like Pliney the Elder. The author is the Brewmaster at Stone Brewing, so when it comes to bitter beer, he knows what he is talking about.

The recipe reference in the book is worth it alone, about 60 pages in total covering historic and modern IPAs. Don’t expect to get the times and amounts of ingredients in recipes though (bummer). The key appears to be aggressive dry hopping in most cases!

IPA Brewing Techniques, Recipes, and the Evolution of the India Pale Ale

There is a lot to learn from this book. It challenges the historical myth that IPAs (India Pale Ales) were brewed specifically for export to India because nothing else could survive the journey. The author points to evidence that Porters, Pale Ales, and all kinds of brews were shipped to India for almost a century before the name IPA came along. What we do know is the beer back then had stability problems, and hoppier, stronger beers were more suitable to such a long haul. These high quality, strong, bitter beers were originally sold as Pale Ales or October ales. In the early to mid 1800’s Pale Ales were re-branded to read “Pale Ale for India”, or “Pale Ale brewed Expressly for the India market” – seems like more of a marketing switch than a recipe formulation issue to me. In the end the name stuck, but the style evolved considerably.

A typical “IPA” or Pale Ale from the late 1700’s was radically different from what we think of as a modern IPA.

  • Most IPAs back then were SMaSH brews (single malt and single hop). This makes sense because pale malt and Kent Goldings were pretty much what was on hand. There were specialty grains, a few other hop strains, but they were not as common in IPAs.
  • The beer was aged for 9-12 months in oak casks. The oaking would make a huge flavor difference on such a light colored beer!
  • Beers were likely tainted with a cocktail of bacteria including Brettanomyces, Pediococcus and Lactobacillus. That explains the sour and tart flavors in historical tasting accounts.
  • IPAs back then were often dry and even sparkling!
  • They were typically high in alcohol, 7%+.

Two world wars, prohibition, and the rising popularity of the continental lager all but destroyed IPA brewing for most of the 1900’s. However, this all changed in the 1990’s with a craft beer renaissance. This was enabled by new hop varieties like Cascade that were becoming widely available. I am proud to say that my hometown, Eugene, OR is credited in the book as being the first craft brewery to put an IPA on tap continuously – Steelhead Brewing Co, with its Bombay Bomber! Thank you Teri Fahrendorf!

The book also helped me realize just how spoiled we modern brewers are given the wonderful selection of hops available to us. Consider, what would the world be like without the four C’s (Cascade, Columbus, Chinook and Centennial)? Let’s not forget the patented strains Simcoe and Amarillo which run up in about 10 years. There are new hop strains being developed all the time, so the future looks great for the variety and quality of new IPAs and beer styles. Going forward, brewers will continue to push the limits and evolve the IPA style. New categories may someday be introduced to cover the twists like Black Ales, Black IPAs, and Cascadian Dark Ales (CDAs). We discussed that issue previously in this article: Black Ale as a Beer Category.

Here’s to filling all your kegs with IPA’s and IIPA’s – cheers!

Post by Larry

Using your Refractometer Correctly for Maximum Accuracy in Home Brewing

Wednesday, April 24th, 2013

A refractometer is a nifty brewing instrument that allows a gravity reading to be taken with just a single drop of wort. It beats wasting 6-8 ounces for a hydrometer sample. The drop of wort is spread across a flat lens with a clear plate that snaps down over it and uniformly spreads the fluid. The refractometer is then held up to a light source and you look through it, sort of like a telescope.

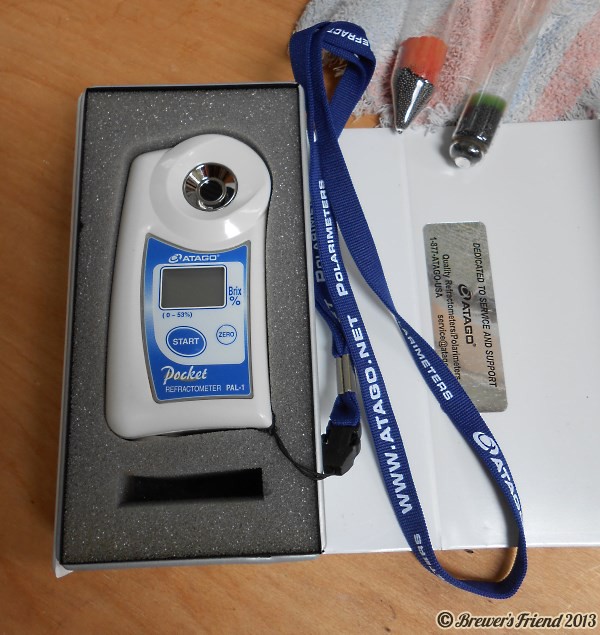
Update 6/14/2013 – the unit pictured here is cheap made in China version off Amazon for $40. With refractometers, you get what you pay for. Check out our evaluation of the PAL-1 digital refractometer if you want to see what a top of the line model looks like.

Refractometer Home Brewing

Refractometer Home Brewing Detail

Refractometer Home Brewing When Looking Through at Scale


There are some caveats for proper refractometer use – otherwise they can be frustrating to work with:

  • Refractometers need to be calibrated with water to read zero. Calibration may be necessary before each use.

  • IGNORE the SG scale if your model has it – only pay attention to the Brix scale. The relationship between Brix and SG is not linear!

  • Like hydrometers, refractometer readings are temperature dependent. Some models support ATC – automatic temperature correction, and have varying degrees of success at this. I let my samples cool to below 100F / 37C before using them so I don’t burn myself.

  • Cheap refractometers are not very consistent measurement to measurement from the same wort. I take 5+ measurements then average the value before recording. The variance is +/- 10% either way! What a joke. You get what you pay for and this unit was a gift.

Refractometers and wort:

The convenience of refractometers comes with a price as refractometers are not as straightforward has hydrometers when it comes to measuring wort gravity.

Refractometers measure the angle of refraction as light shines through the solution. They are typically calibrated for sugar water. Wort however has a different density and contains more complex sugars.  This throws off the refraction index. Any wort gravity reading from a refractometer needs to be adjusted by a ‘wort correction factor’.  For the home brewer, a wort correction factor, specific to the instrument, needs to be determined to accurately measure wort samples.

We have complete guide, including spreadsheet for recording measurements, that will help determine your Wort Correction Factor.

To help clear up confusion with terminology, at Brewer’s Friend we have decided to call a Brix measurement of wort: Brix WRI (wort refraction index).  Brix WRI makes it clear the measurement pertains to wort and is unadjusted. Only after dividing Brix WRI by the wort correction factor do we arrive at the actual Brix / Plato reading. It is helpful to know that Brix and Plato are nominally the same to 3 decimal places, so the corrected reading can be treated as Plato (°P).

Refractometers and Alcohol:

In the presence of alcohol, refractometer measurements get even more complicated. Alcohol throws off the refraction even more. The good news is, it can be corrected for if the OG is known. Sean Terrill posted research on the subject and arrived at the following equation which we have taken to be the most accurate:

FG = 1.0000 – 0.0044993*RIi + 0.011774*RIf + 0.00027581*RIi² – 0.0012717*RIf² – 0.0000072800*RIi³ + 0.000063293*RIf³

https://seanterrill.com/2011/04/07/refractometer-fg-results/

Using Refractometer measurements at Brewer’s Friend:

Using a software package like Brewer’s Friend will mitigate the complexities of using a refractometer to a large extent.

April 2013 Release is Live, Refractometer Support, Calories, iPhone 1.2 sync, Lifetime Memberships

Friday, April 19th, 2013

More cool new features at your disposal. Our mission is to help you brew better beer! Enjoy!

Refractometer Support:


Calories per 12oz / 355 mL:

  • The recipe editor, under the More… section will now show the calorie count.
  • In the brew session section, there is a new line for calories which appears after the fermentation completely log entry is made.Calorie Calculation Beer In Recipe EditorCalorie Calculation In Brew Session


Lifetime Memberships Available:

  • We have re-enabled Lifetime Memberships!

    Lifetime Membership

  • If you already have a Premium Membership that has a lot of time left you are in a good spot. Down the road we plan to setup a discount program for members who want to convert from a Premium Membership to a Lifetime Membership.


iPhone 1.2 Release, which supports sync (premium account required):

Other Updates:

  • Our Stand Alone ABV Calculator has been updated to calculate calories, attenuation, and support Plato!
  • Usual minor bug fixes, platform updates, etc.

Don’t forget about The Big Brew Day, coming up May 4th at your Local Home Brew Store!  At the stores here in Portland there will be lots of brewing going on, food, discounts, and of course home brew! Have a blast!

Happy brewing!

Brewing Water Treatment in 600 Words

Friday, April 12th, 2013

It seems that over the last few years many more home brewers have taken an interest in understanding and modifying their brewing water. And there are good reasons to do so. Depending on the beer that is brewed and the water quality, modifying the brewing water can take a beer from great to excellent. The intent of this post is not to go into the details of water and mash chemistry but to provide an overview of what’s important and paint a high level picture of water treatment for brewing. For those counting, the first paragraph doesn’t count towards the 600 words.

When it comes to brewing water treatment there are 3 goals we brewers are trying to achieve:

  • eliminate off-flavor causing water compounds: this is largely the removal of chlorine
  • provide a water ion profile that supports the desired flavor of the beer
  • provide a water and grist composition that settles at a desirable mash pH

What’s daunting for many brewers is not so much the underlying chemistry, which is easily handled by a brewing water calculator, but the many parameters that can be adjusted.

Chlorine, found in water as free chlorine or chloramine, needs to be removed from brewing water since it forms nasty chlorophenols in beer. Most brewers accomplish this through carbon filtration or Campden tablets (sodium or potassium metabisulfite). Another undesirable water compound is iron. The water’s iron level should be below 0.3 ppm to avoid a metallic taste.

Brewers care about 6 primary water ions that are able to affect the flavor of the beer. The electric charge of the cations (Ca2+, Mg2+, Na+) needs to match the electric charge from the anions (Cl, SO42-, HCO3) which is why one cannot be added without the other. Here is a quick summary of what these ions do for the flavor or brewing process:

Calcium (Ca2+) is beneficial for the brewing process as it helps with yeast flocculation. It’s also fairly flavor neutral and a recommended minimum is 40 mg/l. The most common means of increasing calcium in water are gypsum and calcium chloride which also adds sulfate and chloride, respectively.

Magnesium (Mg2+) from water is not needed since malt provides lots of magnesium to the wort. Excess magnesium can cause a bitter taste. Should be kept below 50 mg/l.

Sodium (Na+) can lead to a salty taste and should be kept below 100 mg/l. Brewers don’t usually add sodium except when baking soda is used to add bicarbonate.

Chloride (Cl) creates a softer beer flavor and is desired in malt forward beers.

Sulfate (SO42-) enhances hop bitterness and dries out the beer’s finish. It is desirable in hoppy ales and some brewers even go as high as 700 mg/l. Most hoppy ales should be fine with sulfate levels between 100 and 300 mg/l

Bicarbonate (HCO3) does not affect the taste directly but can have an indirect effect through its ability to raise mash pH out of its desired range.

Mash pH is the result of the balance between pH active water ions, grist and any acid or salt additions that are made. In most cases we are looking for a mash pH in the 5.3 – 5.6 range. These numbers are for a cooled (25 C/ 77 F ) mash sample. Dark malts and acids are the primary drivers of lower mash pH while water alkalinity raises mash pH. Calcium and to a lesser extent Magnesium also lower mash pH but not enough that mash pH control should be done through adjusting calcium or Magnesium levels. In most cases mash pH adjustment requires the addition of acids (lactic or phosphoric are popular choices) to neutralize water alkalinity. Lighter beers may even need more acid to go beyond neutralizing the water alkalinity in order to get mash pH into the desirable range of 5.3-5.6.

To get started you need to find or get a water report for your brewing water, enter the water ion levels and grist information into the Brewing Water and Mash Chemistry calculator and see where you land. From there you can play with salt and acid additions. Target water profiles designed for various beer styles can guide you in your water adjustments.

Image of common brewing salts:
Brewing Salts Calcium Chloride Gypsum
Notably, canning salt, and chalk are not pictured here.

Post by Kaiser

Beer on the Go in PET Bottles

Thursday, April 4th, 2013

Check out this nifty method of packaging beer from the keg into light weight plastic bottles.

I started kegging after almost 2 years of bottling. I fell in love with the fact that I now had one big “bottle” to clean and sanitize rather than about 50.

One of the challenges that emerged after I started kegging was taking homebrew with me when we’re away from home. Often I didn’t want to bother taking a keg with me.

I began looking for solutions. I frequent HBT (Home Brew Talk), and was soon acquainted with the now-famous Biermuncher Bottle Filler. This method of filling bottles is often referred to as the BMBF, for short.

It detailed how to fill 12 oz or 22 oz bombers without an expensive counter pressure bottle filler. Hundreds of posts on dozens of pages show how effective it is. I quickly made one, followed his process, and began enjoying convenience of beer on the go even though I keg.

Here’s a summary of Bier Muncher’s method:

  1. You fill from a picnic tap hooked up to your keg.
  2. You use a plastic racking cane. At the end of the long end, you cut a 45 degree angle.
  3. You use a #2 drilled stopper – best to get food grade.
  4. Put drilled stopper on racking cane, attach short end cane into the picnic tap – it fits snugly.
  5. Shut off CO2 to keg. Bleed the keg of pressure. Turn regulator down to 5-6 psi. Refill keg with CO2 at that pressure and leave regulator at that 5-6 lbs pressure.
  6. Put cane into beer bottle, adjust the stopper so it seals the bottle opening. Begin to fill the bottle.
  7. When beer filling slows/stops, burp the bottle…that means the CO2 pressure has filled the headspace and the beer won’t flow. Keep burping on occasion until bottle is full. Let it go all the way to the top. You’ll burp about 2x for a 12 oz bottle.
  8. Remove cane from bottle. Place cap on bottle, but don’t seal. Hold it down, invert bottle, right the bottle, let the foam spill out (this fills the headspace), then replace cap while the foam spills out and seal it.

Here’s a link to the original thread on HBT. Read the initial post by Biermuncher. It includes pictures.

https://www.homebrewtalk.com/f35/we-no-need-no-stinking-beer-gun-24678/


Here’s a photo of my BMBF – notice that 45 degree cut at the bottom of the racking cane:

BMBF bottling cane
If you decided not to read the post, here’s a summary: you use this item – a plastic racking cane with a 45 degree angle cut at the bottom, plus a #2 drilled stopper – by inserting it into a picnic tap attached to the keg. You use it to fill the bottle. It’s easy, but there are some important details to his process that make it effective. If you want to try it you need to read the post! Later on I explain my process, and you won’t understand some of it unless you’ve read the post.

While this method worked great for events around town, once camping season rolled around a problem surfaced – I wanted to take my beer along in non-glass bottles. Part of that was due to no glass at campsites, and the other part was simply weight…camping for a week and taking a bunch of homebrew is heavy! I didn’t want to take a keg and regulator…I wanted the simplicity of bottled beer but not in beer bottles.

I started thinking about alternatives, and quickly settled on PET soda bottles. They come in lots of sizes, are durable, super light, reusable or disposable as circumstances dictate, and they’re made to handle even higher PSI beer – soda is has a much higher carbonation level. I decided I’d adapt the BMBF for PET and see how it worked.

“The Carbonator” cap is another alternative, but they’re expensive and can only be used on one bottle…multiple bottles get expensive at around 15 dollars each! The BMBF process adapted for PET has most/all of the benefits at a much lower cost!

Here’s what “The Carbonator” looks like:

The carbonator for home brew in plastic bottle


The #2 stopper for glass bottles wasn’t sized for PET bottles. It took some research but I figured out what size stopper will work with PET bottles – a #4. It was not easy to find a food grade #4 stopper…my LHBS didn’t have them and many online brewing supply sites didn’t. I finally found them and ordered a few.

Take a look – #2 on the left, #4 on the right:

home brewing stoppers size 2 and size 4

Once the #4 drilled stoppers arrived, I went to work trying the process out on the PETs. It worked great! I now don’t even bother with glass bottles. PET is my beer on the go solution. Part of the benefit is that you can even get to a growler size with PET – a 2 liter bottle!

Check out all the possible sizes – Left to Right: 12oz, .5 Liter (about a pint), 1 liter, 1.25 liter, 2 liter:


home brew packaging different size plastic bottles


If you follow the BMBF process to the letter, the PET bottles kept a cold temperatures (so the CO2 will stay in solution better) will hold appropriate pressure for 1 week, and is often still acceptable for 2 weeks. Eventually the seals on the caps begin to wear out with reuse, so I recycle the bottle when I get a beer that’s flatter than I’d expect. Letting your beer-filled PET bottles get warm can also affect the CO2 retention in the bottles.

When you fill a PET bottle using the BMBF process, it should end up very firm…approaching but not equaling the firmness of a new, unopened bottle of soda.  What typically happens is that it’s pretty firm right after filling. I place the bottle in the fridge and check it again in 10 minutes. If by then the bottle isn’t very hard, I invert the bottle and cap on the foam once more. That usually takes care of any storage issues. If it still isn’t firm after a second try, I know the PET bottle cap is likely worn out. I switch out for a newer cap, and throw away/recycle the old cap.

Here’s a photo of an never opened 64 oz soda bottle. Almost no indentation with a firm squeeze:


full plastic soda bottle


Here’s a filled 1 liter right after filling and capping on foam. It’s pretty firm…see how there is some give?


plastic bottle beer just filled


Here’s how it looked 20 minutes later and still chilled – much more firm, and of a firmness that will allow extended storage that maintains adequate carbonation. If it wasn’t as firm as shown, and it wasn’t going to be consumed that evening, I’d have topped off the bottle with more beer, inverted, and capped on foam again. That normally does the trick.


home brewed beer in plastic bottle properly carbonated


This is how I take small/medium volumes of homebrew around locally. It’s my exclusive method for camping now. I fill some small singles for that afternoon quenchers – low volume times when we wouldn’t drink a whole growler. I also fill some 2 liters (growlers) for the evenings around the fire telling fish stories, etc. when we’ll be drinking at a pace that the beer from growlers will still be appropriately carbonated.

In earlier blogs I talked about taking Summer Shandy and also Honey Chamomile Wheat to parties. In both those cases I filled 2 liter PET bottles – 6 of them – with these brews. I put the 6 growlers in a big freezer bag (the ones you can buy at Costco) with some cold packs. It works great and you can leave the growlers behind after you leave without losing anything valuable. Also, they aren’t breakable if the party gets rowdy.

The great part is that between you and friends you can get a ton of PET bottles for free! Many families drink soda , sparkling water, etc. Just ask them to save you the empties. A bit of Ivory dish soap cleans them out and rinses well for no aftertaste.

If you’re looking for a durable, convenient, almost free, and effective way for beer on the go, give the BMBF process a try with PET bottles. You might find it suits your beer on the go needs as well as it does for me.

Post by Brewer kcpup