Wednesday, June 1st, 2016
We’re really excited to share two of our largest announcements ever! Read on for details on how we’re improving the Brewer’s Friend website and making it more convenient to brew your best beer.
First, a facelift…
As you all know, the Brewer’s Friend website has always had a quirky look and feel that seemed a little dated, but got the job done. Over time, we’ve seen website design evolve quite a bit and new techniques have come along to make things better for mobile browsing, performance, and user interaction. As a result, we’ve been working hard on completely re-skinning the site, while enabling a more mobile-friendly UI and more modern appearance; all while preserving the exact same core functionality and tools that we all know and love.
That work has finally paid off and we’re excited to unveil the new look of Brewer’s Friend!
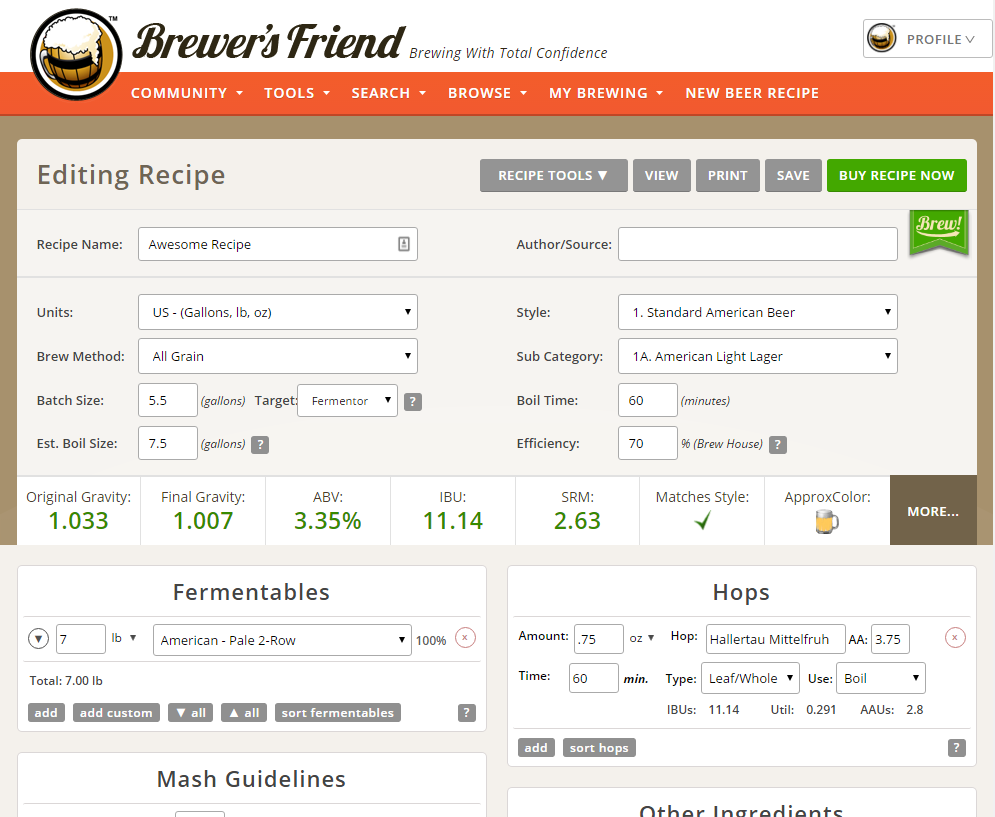
As you’ll notice, we’ve breathed new life into the color scheme, fonts, and layout. But if you look deeper all the buttons, data, bells & whistles are all exactly where you left them, just with a fresh coat of paint. Our goal is always to make your brewing the best it can be, so we did our best to keep the functionality of the site as familiar as possible.
Change is definitely tough and we know there will be things you love with the new design and things that you miss about the old look; we’d love to hear that feedback so we can make it even better – just drop us a line here:
https://www.brewersfriend.com/feedback-welcome/
One-Click Recipe Ordering
As homebrewers, we’re always looking for the best way to get the best ingredients for our beer. Usually, this involves pulling up our recipe, jotting down the list of things we need, how much of each, preferred brand, etc. Then we go to our favorite LHBS or online homebrew supply and individually pick out each product. And inevitably something is missing or out of stock and then we get to consult substitution charts, or rework our recipes. Frustrating.
We gave this process a lot of thought and we’re very proud to announce a new feature that we believe solves this problem. In partnership with HomebrewSupply.com, we have built a one-click ingredient ordering system for all Brewer’s Friend recipes.
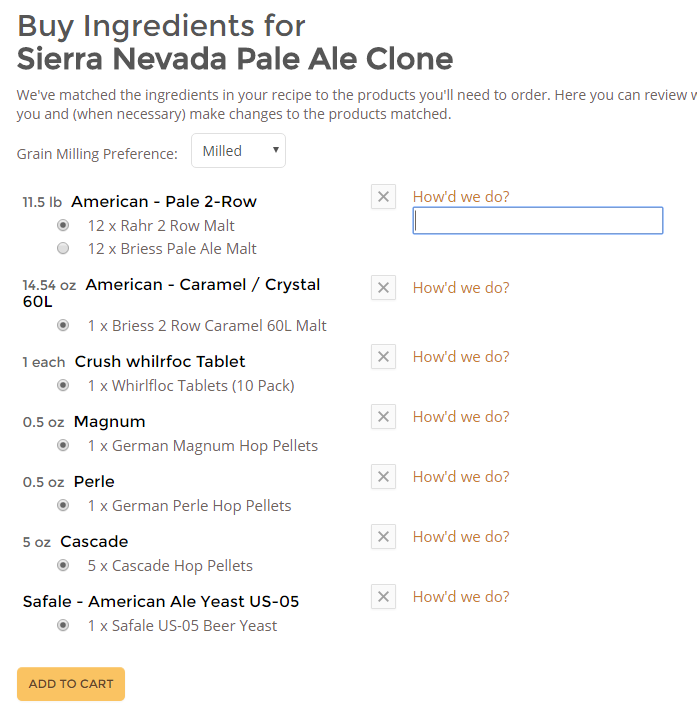
Now when viewing or editing any recipe on the Brewer’s Friend site, you can now click “Buy Recipe Now” and you’ll immediately see a list of the ingredients & products you’ll need to brew your recipe, the quantities needed, and even recommended alternatives when necessary. You can quickly review this list and then add your ingredients to your Homebrew Supply shopping cart in one simple step.
Behind the scenes, the system takes your list of ingredients and carefully matches them to products that should fulfill your recipe. If there’s more than one product that could be used for your ingredient, you’ll be given those options so you can tailor your brew to your brand preferences, etc. So if you have “American – Pale 2-Row” in your recipe, you’ll be given the options for Rahr 2 Row as well as Briess.
And you can even make a selection for your grain milling preference for the recipe before placing the ingredients in your cart.
Finally, we really want to hear your feedback on this new ordering feature. We’ve put a lot of time into the ability for it to intelligently match ingredients to products, but we’ll continue to do even better over time. So if you have feedback on what was matched, or not matched, please click the “How’d we do” box next to the ingredient and give us some info before adding it to your cart. Or if you have more general feedback on the feature, we’d certainly appreciate that too:
https://www.brewersfriend.com/feedback-welcome/
What else is new?
Of course, we’re always working to improve the Brewer’s Friend tools, on the website and mobile apps. Since our last newsletter, we:
Made improvements to the Brewer’s Friend Windows App – fixed some bugs in calculations on the brew day feature and added better support for US units, especially when making brew day calculations.
Fixed a bug on the My Recipes page that occasionally caused crashes related to Brew Session data. The page should be more stable overall now.
Released two updates to the Brewer’s Friend iOS app – fixed some formatting issues with certain fields in the brew log. Released a full updated to the ingredient data in the app, including hops, fermentables, and yeast.
Our First Recipe Giveaway Winners!
Our first ever recipe kit giveaway concluded this past week, and we’re excited to announce the winners!
TheZ
Brewer #19658
thomurray
mdbitt
David Bader
Brewer #53216
Beercat094
BungBrewer77
Jpdomanico
JugDog Brewing
Each winner will receive a recipe kit from HomebrewSupply.com.
Thanks!
We’re really excited about these improvements and new features and hope you’ll find them to be helpful in your homebrewing experience. Thanks to all of you in the Brewer’s Friend community for helping us make our tools the best they can be, so we can make the best beer together.
Cheers!
The Brewer’s Friend Team
Posted in Announcements | No Comments »


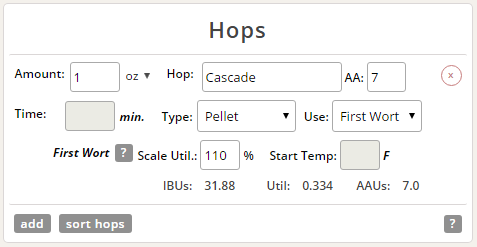 We’ve heard lots of feedback on the way Brewer’s Friend deals with First Wort Hops and today we’re rolling out some updates to the Recipe Builder, offering better calculations for First Wort additions. For details on what First Wort Hopping (FWH) is, check out our FAQ and original blog post here:
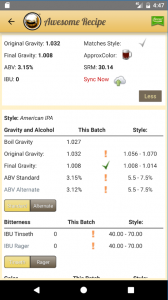 It’s been a LONG time coming, but we’re excited to announce that we’ve updated our Android app! It was very overdue for some improvements, so we started by fixing some of the more serious issues, including: