Sunday, October 27th, 2013
After reading and reviewing For the Love of Hops, I had some follow up thoughts. Stan Hieronymus was very nice in replying to all my questions promptly in this interview style blog post.
Stan has authored several books on beer and home brewing and runs an informative beer brewing blog. He can be found on twitter as @StanHieronymus.
Hops Varieties:
Q: Do you think the number of new hop varieties that come out each year will continue to grow? When will we reach a saturation point and why?
Stan: In the short term I would expect the number to rise, because there are so many unique varieties under development and there is such demand. However the logistics of production will cap the number at some point. What may add to choice is the realization there are differences between varieties grown in different location, so there’s every chance brewers will begin to talk about the difference between Cascade grown in Oregon from that in Washington, then on a smaller scale in Michigan. The breadth of what is available will surpass the number of new varieties.
Q: Do new hop varieties go through any FDA approval, given all the exotic complex oils they contain? Aren’t the new hops tested heavily in brewing trials before they would ever make it to market for home brewers?
Stan: There is no FDA approval process for hops, but they go through a long trialing process before they are released (see the next answer). Brewers who dry hop, particularly with whole hops, should be concerned how those hops are processed. That’s just one of the reasons the craft brewers who have banded together to form the Hop Quality Group are important. They want to make sure, for instance, that hop kilns have netting so that birds are not, pardon my French, crapping your hops.
Q: How long does it take for a new hop strain to be available?
Stan: At least 10 years, usually a few more, to make sure a) the variety can be grown economically, b) that it is relatively disease free, c) it has aroma and flavor characteristics brewers want, and d) it remains consistent from one growing season to the next.
Q: Given the recent BRCA gene Supreme Court ruling, I was wondering if the patent on Amarillo hops might be technically invalid because it was “naturally occurring”?
Stan: I’m not expert in the law, everybody I talked to in Washington (the state) is certain the patent remains intact.
Hops for Home Brewers:
Q: What is the most accurate way to calculate IBUs for first wort hops? Our calculator currently treats it as a 20 minute addition, but we are considering changing this.
Stan: Like a 75 minute addition.
Q: How can home brewers get the most bang for their buck in terms of making hoppy beers? Hop stands, dry hopping, double dry hopping, hop bursting? Which techniques require extra equipment, and which techniques can be done on a budget? Pellets vs whole leaf hops?
Stan: All of the above. Seriously, first it depends what you are gunning for. Dry hop a beer and serve it fresh, that’s pretty dang efficient. Want something you can put in a bottle and enter in competitions, then late additions may be more effective because they are more stable. I love beers made with whole hops added to a hop back, and your can build one of those at home pretty cheaply (much more cheaply than your local brewery), for some hard to pinpoint quality and their stability. But they are not as efficient, or consistent than pellets.
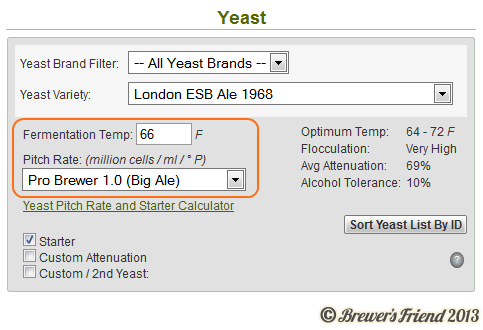
Q: In terms of yeast’s impact on hop flavor aroma and bitterness, which yeasts mute this and which yeasts accentuate it? Does yeast pitch rate or fermentation temperature impact this to any extent?
Stan: You might be asking about the next hop frontier. Or at least one of them. These are all experiments that need to be done. It isn’t just a matter of a yeast muting or accenting hop aroma, but how they change the odor compounds. Same with pitching rate and what oils yeast may drag out of solution during floculation. It is great to get laboratory analysis, but there’s a lot than can be done through sensory evaluation- and that means it can be done at the homebrew club level. Use the same hop-forward recipe varying only the yeast strain, for instance.
How Pro Breweries Do It:
Q: Do you have pictures you can share of the Sierra Nevada Torpedo setup and a HOPNICK? They sound pretty cool!
Stan: Here is a photo of the Sierra Nevada Torpedo setup:
Here is also a link to the ROLEC DryHopnick brochure: https://www.rolec-gmbh.de/_engl/gfx/Info_ROLEC_DryHOPNIK_E.pdf
Interview text and photo used with permission of Stan.
Post by Larry
Posted in Brewing | 1 Comment »