Better Bottle Blowoff Tube
Saturday, July 28th, 2012When I had been brewing about six months, I transitioned from glass to Better Bottles. These are PET plastic fermenters. I was hauling carboys up and down stairs from basement to kitchen frequently. Even with a Brew Hauler strap system, the breakage potential and resulting safety issue was hard for me to stomach. When I read a letter in Zymurgy from a brewer that nearly lost his hand due to a broken glass carboy, that sealed the deal and I made the switch. I’m not criticizing glass carboys for other brewers – I’m just saying they weren’t a fit for me and my brewing.
I quickly settled on Better Bottles, mainly because I loved seeing the fermentation and not having to open the container (like plastic buckets require). Even years later I still love seeing fermentation!
I brew a lot of Belgian Wits – this style is always on tap at our house. White Labs WLP400 is a climber! The first time I fermented a Wit in a 6 gallon Better Bottle I had a big blowout and resulting cleanup. I began combing the forums for how people made blowoff arrangements for their Better Bottles. There weren’t that many posts on Better Bottles to begin with, so it was slim pickings on advice. However, I did find a few posts that talked about a #10 drilled stopper with plastic tubing running into sanitizer or your liquid of choice. I tried that setup, and for Wits and Hefes it still wasn’t enough – more blowouts and cleanups. I was back to square one.
After more research, I discovered that the manufacturer of Better Bottles makes a blowoff assembly specifically for the Better Bottle. The asssembly’s hole was a larger diameter than the tubing I had been using, so I ordered two and decided to give them a try.
Here is a photo of the blowoff assembly Better Bottle makes:

This is really nice, heavy plastic. There’s a teflon-coated o-ring that makes a secure seal, and you’ll notice that the opening is threaded.
This next picture highlights the reason for the threading – the blowoff assembly is made to work with a ¾ inch PVC fittings. See below:

The PVC pipe is a much larger diameter than the tubing I used to use. It is also really easy to clean and to sanitize because it disassembles. Here’s a shot of my setup fully assembled (this photo was taken after I’d done cleanup, hence the empty fermenter, etc.):

What I like about using the milk jug is that I can put some water in it to settle just under the PVC pipe, plus it has a wide bottom that makes it hard to accidentally knock over. During the summer I occasionally have issues with fruit/vinegar flies hanging around my fermenters. By the milk jug having a narrow neck and by adding water to a level just under the PVC pipe, I can prevent flies from getting into the fermenter. I get the benefits of an unrestricted ‘open type’ fermentation – no back pressure from liquid in an airlock or other container, and I also mitigate the risk of contamination.
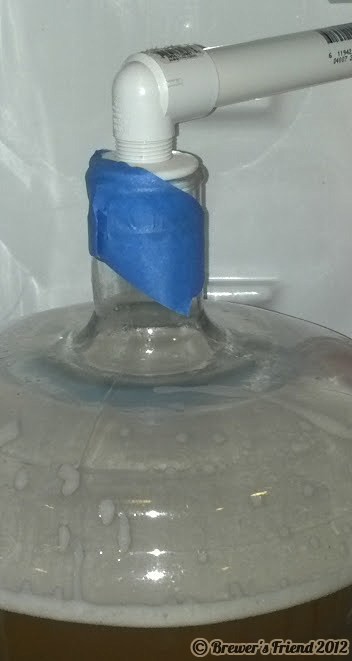
One important note: if you have ‘Vintage Shop’ brand PET bottles (they look similar to Better Bottles without the bands – they’re smooth) the blowoff assembly does not fit solidly in the neck. It covers the opening completely, but the neck does not have a rib that will hold the o-ring.
Here’s how I use the blowoff assembly with the Vintage Shop brand…painter’s tape holds it:

I have had great success with this arrangement and don’t have to worry anymore about cleaning up a blowout. If you use Better Bottles and use yeasts that are heavy climbers or aggressive top croppers, this blowoff rig could be a useful addition to your setup.
Post By Brewer kcpup


4 Responses to “Better Bottle Blowoff Tube”
Does a one inch inner diameter, 3 foot long tube not work for better bottles? I am in a similar situation as you and will likely be making the switch soon as well.
By Steve on Aug 7, 2012
Hose would work, just not as sturdy. You’d need to get the proper bung to accommodate the setup.
By Larry on Aug 7, 2012
It sounds like you don’t actually put the end of the PVC in the water, correct? I thought you had to have it in water/sanitizer solution to prevent infection. Am I wrong about that?
By JT on Aug 10, 2012
JT, actually whether it needs to be submerged is a matter of choice. During the highly active stage of fermentation when the yeast are throwing off a lot of co2, I do not submerge the pipe. That’s why I called it an “open type” fermentation. Brew Strong had an episode a few years ago where the benefits of no back pressure on the yeast was discussed. Using an airlock, or submerging a blowoff tube in sanitizer adds back pressure to the fermentation by creating pressure against the wort, hence the bubbles in the airlock. There is some advantage to removing pressure from the initial vigorous stages of fermentation. IIRC, it puts less stress on the yeast. After heavy convection is over, I replace the blowoff assembly with an airlock. This is a matter of choice, and there’s no right answer. After listening to that podcast, I decided to try it and I found that I liked the results. Hope this helps clarify my post. Cheers
By Kcpup on Aug 12, 2012