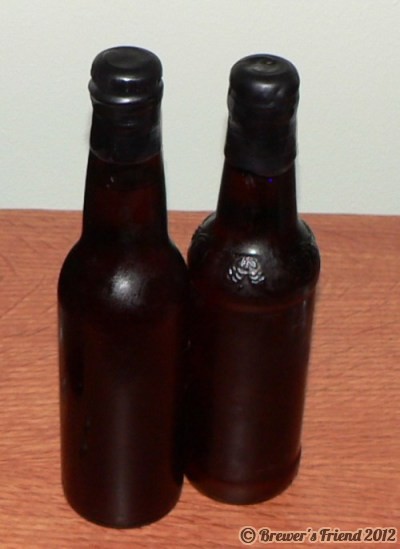
Wax Sealed Home Brew Tested
Saturday, November 20th, 2010For centuries the seal of choice on spirits and wines was melted wax. Lately special release craft beers are being sold with a wax seal. Home brewers can wax seal bottled beer without too much trouble. All it takes is melting the wax, dipping the top of the bottle, and letting it dry. The wax adds a touch of old world feel to the bottle. A wax sealed bottle screams: “I contain some serious brew!”.
I tired this to see what it is like. I’m glad I did it once, but I probably won’t do it very often.

The wax can be bought in a variety of colors. Search for ‘bottle seal wax’ or ‘bottle wax’ online or at your local home brew store (LHBS). It might be in the wine section. A one pound bag is available for under $10.

Process:
Bottle your beer as normal and cap. I recommend oxy-caps. Clean out a tin can you don’t care about and gently melt the wax. Prepare a landing zone for the dipped bottles. The wax gets really hot and in my case, started to pop and shoot everywhere. It took a lot of time to get the wax completely melted, a puck formed on the inside of the can. I recommend a mild heat setting to melt the wax and a long stick to stir with. Make sure to turn off the burner when you go to dip the bottles.

Safety Disclaimer: The wax is hot and you should wear eye and hand protection. Do not over heat the wax, and do not leave the flame unattended. Shut off the flame when you are working above it. My package of wax recommended a temp between 160F and 170F, and to never pour water on a wax fire, instead use an extinguisher or cover with a metal lid.
After dipping the top I rotated the bottle to help cover the crimps in the cap. The cap is the hardest part to cover completely. Multiple coats will be needed depending on how thick you want the wax to be.


The wax can also be spooned out on top of the beer cap but this can create runs. Some people add floss or some kind of fabric around the cap so it makes the tear off easier.
Do It Yourself Wax:
Some people have used Gulf Wax (parrafin) and crayons for tint. This approach is a little cheaper than buying the already made wax beads. Using your own wax may require mixing in Vaseline or other additives to get the desired texture. I think buying the bag of wax pellets made for this purpose is worth the extra couple of dollars.
An excellent thread on a do it yourself approach using glue sticks is here:
https://www.homebrewtalk.com/f35/hot-glue-bottle-wax-experiment-127485/
Some Critiques On Wax Sealed Beer:
Yes, the wax seal makes it harder to open the bottle and creates a mess, sealing the bottles is time consuming, and the need for an additional seal beyond the cap is questionable. The benefits are mainly aesthetic. Home brewing is all about fun, and pride in your brew, so go for it if you want to! I would not put much faith in the extra sealing power the wax affords. I use oxycaps on all of my bottled beer, and I’ve opened bottled 2 years later that tasted awesome.
One clear drawback I noticed is the extra time it takes to clean the bottle if you want to reuse it. Of course that is not a concern when the bottle is given away.
In commercial news on this issue, Maker’s Mark bourbon has legal protection for their wax sealing practice as it was ruled to be part of their trademark: https://www.nytimes.com/2010/04/03/business/03bourbon.html
Big dark beers like Barely Wines, Belgian Strongs, Russian Imperial Stout, Double Imperial Porters, etc… are all great candidates for wax sealing!


6 Responses to “Wax Sealed Home Brew Tested”
The wax would melt more safely and evenly if you put that can in a pan of water instead of on the fire directly.
By Ray Krueger on Nov 21, 2010
Thanks for the tip Ray!
By Larry on Nov 21, 2010
I will have to try that for gifts. As ray said use the water. It’s way safer.
By Matt on Nov 22, 2010
That’s cool
By Matthew Martin on Nov 22, 2010
Quickest way I found to open them is to take a knife and along the glass bump and just like you would sharpen a small branch for dog roasting, chip away at the wax while rotating the bottle until there is a gap of no wax. (Do this while over a garbage can, of course…lol) Then just dig a small moat through on the edge you want to insert your standard bottle opener. Then work your bottle opener in and pop that sucker…no mess at all! Viola!!
By Shaun on Apr 15, 2011